Thursday, February 28, 2013

GIVEAWAY and Review: Premama Prenatal Vitamin Drink Mix

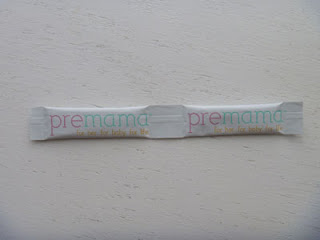
No, I'm not pregnant and trying some creative way of announcing it to the world. The name of the product, Premama Prenatal Vitamin Mix does make you think that you would have to be pregnant to use this product, but really it is a vitamin drink mix that anyone can use that is package in half servings so that you can get your full recommendation of prenatal vitamins (which are usually a lot more than a regular multi-vitamin and are sure to include folic acid) in 2 servings throughout the day. But it really is a vitamin drink that anyone could take but does tailor some of the ingredients towards pregnant or nursing moms but are still things others will find beneficial.

When I was pregnant with my kids, I would take that prescription from the doctor for the prenatal vitamin and attempt to take them only to find that they upset my stomach that was already very sensitive and already dealing with all-day nausea and only led me to have a puking episode within 10 minutes of taking it. I quickly stopped taking those pills (that were the size of horse pills and hard to swallow) and went back to my regular multi-vitamin. I kinda wish this was a product I knew about when I was pregnant because this would have been a much easier way to take my prenatal vitamins.


Some of the vitamins, minerals, herbs in Premama that are designed to help during pregnancy might not necessarily be on a regular multi-vitamin include: Iron (healthy blood cell formation), Vitamin D3 (healthy bone health and Immune function), Folic Acid (reduce risk of neural tube defects), CoQ10 (reduce risk of pre-eclampsia), Ginger Root (nausea relief), plus many other vitamins and minerals.

I remember those days with 20 and 16 weeks of all-day nausea. Yup, it sucked and I would have tried anything, so the idea that my vitamin could have also offered some nausea relief would be welcome.

They recommend taking it with 6 ounces of a cold beverage with vitamin C in it. The vitamin C helps with iron absorption but could be mixed in other cold beverages. I first tried it 100% juice blend that had a day's serving of Vitamin C and as the product claimed it was flavorless when put in a flavored beverage. I did try it in water & ate an orange, but in that I could taste something (I think it was the DHA), so I will have the rest in juice.

Some doctors and organizations recommend that all women ages 15 to 50 take a prenatal vitamin every day since 50% of all pregnancies are unplanned.

I was given a 30 day supply of Premama Prenatal Vitamin Drink Mix to review and 
ONE LUCKY READER WILL WIN A 30-DAY SUPPLY!


a Rafflecopter giveaway

I was given the product for the purpose of review. All thought and opinions are my own. No monetary compensation was received.

Tuesday, February 26, 2013

Wordless Wednesday: Ivory Soap in the Microwave

This is what happens when you put a half of bar of Ivory Soap in the microwave for 1 minute.


Try It Tuesday: Alpaca Craft

This quirky looking alpaca craft was inspired by this living alpaca that we visited and then my son told me he wanted to make an alpaca. And since I could not find any children's alpaca projects on pinterest, I had to come up with my own and this is what I want to share with you.

Decide on the color your alpaca will be and gather your supplies to suit that color: construction paper, felt, yarn, glue scissors, googly eyes, and a paper plate or piece of cardboard.

If using a paper plate, just cut out the inside circle; if using cardboard you will need to trace a bowl on it to cut out a good circle. Cut out a piece of felt that is the same size.
To make the nose I started by cutting out a rectangle and folding in half. Unfold and then fold in corners to make the diagonal creases shown above. Next cut rounded edges on the two front edges (only one is shown cut, but make two of them rounded.)
Fold the back so that the center is bent and the back edges meet (tape in to place if you prefer). Look at the top picture to see how the nose looks. Glue in to place.

Cut out two ears from the construction paper and a tongue and glue in to place. Glue on yarn pieces and googly eyes.

Monday, February 25, 2013

Make It Monday: Slow Cooker Sausage and Rice Stew

Have I ever mentioned how much I love soups, stews and chilis? It's pretty evident if you are a regular reader of my Make It Monday posts. Especially, ones that are made in the slow cooker. So, here is another tasty one.


Slow Cooker Sausage and Rice Stew
1 lb pork sausage (I like the pork and bacon variety)
8 oz. sliced baby bella mushrooms
3 scallions, chopped
2 celery stalks, chopped
6 oz. dry rice blend (I used 2 oz each of black, brown and long grain rice)
6 C chicken broth
1/2 C fat free sour cream

Directions:
  • Brown sausage on the stovetop.
  • In a slow cooker, combine sausage, mushrooms, rice, scallions, celery and chicken broth. 
  • Cook on low for 6 hours.
  • Stir in cream before serving.
  • Enjoy!

Make All Natural Play Clay

This is an old post of mine, from September 2009 and was originally #107 in my post of tips to be greener, unfortunately this post was getting spammed A LOT. I still wanted this out there but needed to re-post it. Look how little my girl is. So tiny!

This recipe came from the October 2009 issue of Family Fun magazine (p.18). We made this today and it was fun to make some Vikings Colors for her to play with. We made the recipe for the yellow using tumeric, but since we don't eat beets here I wasn't sure how I would make that one, but then today when I had thawed frozen blueberries. It occurred to me that I could use the juice from the blueberries to color it purple. I had about 1/4 C blueberry juice and added hot water to make it 3/8 C total of liquid.

Ingredients
1 C flour
3/8 C salt
1 T vegetable oil
Natural Dye (see below for colors)

Directions
In a bowl, combine flour and salt. Pour in oil & natural dye and stir well. Knead dough for a few minutes. If clay is too soft, add a bit more flour. Store clay in sirtight containers in the refrigerator.

Natural Dye
Brown: 3/8 C plus 1 T hot water, 4 T cocoa powder
Fushia: 3/8 C hot beet juice
Orange: 3/8 C hot water & 1 T paprika
Yellow: 3/8 C hot water & 1 tsp. tumeric

Friday, February 22, 2013

Preschool Theme: Pirates


Here are some of the worksheets, projects and activities that we did this week:


Tuesday, February 19, 2013

Wordless Wednesday: Paint Pub

Paint Pub at the Owatonna Arts Center


Try It Tuesday: Paint & Stick Art Canvas


This was a fun project to do with my son. I think it's pretty good work for a 3 year old! I have found that kids get super excited when you let them paint on a stretched canvas. It is a magical medium to paint on because normally only "artists" use a canvas and things on a canvas stay up a lot longer in a home than something just on a piece of paper. The kids have each painted a couple things before on canvas and they hang in their rooms and they are very proud of these works of art.

I bought a 10-pack of 8x10 stretched canvas at Michael's craft store a few months ago for $10, so each one cost me $1. We used paint and brushes that we already owned. The "stickers" are a raised cardstock quality picture with a foam sticker on the back, I bought that sheet from the Dollar Tree. He didn't use all the stickers and later we will make a couple cards using the remainder.


I had him start out by painting the entire canvas in blue and then we let it dry and did some pirate worksheets in the meantime (check back on Friday for my Preschool at Home Theme on Pirates to see what we used). Then I had him paint in the sun, clouds & island.


When it was mostly dry (we were just impatient, but you could wait until it was completely dry) I let him pick out what stickers to use and where to place them.

He was super excited that he has a new painting for his room. When we were finished he asked for a snack of crackers because parrots eat crackers and pirates have parrots. Smart boy!

Monday, February 18, 2013

Make It Monday: Apple Coffeecake


Apple Coffeecake
1 C honey
1/2 C raw suagr
3/4 C butter
2 eggs
1 stp baking soda
2 1/2 C whole wheat flour
3/4 tsp cinnamon
3/4 tsp salt
3/4 C warm coffee
3 C apples, minced

Topping:
1/2 tsp cinnamon
1/2 C light brown sugar

Directions:
  • Cream together honey, sugar and butter.  Add eggs and beat well.
  • Stir together baking soda, flour, cinnamon, and salt.
  • Stir dry mixture in to wet mixture, alternating with warm coffee
  • Fold apples in to the batter
  • Combine cinnamon and brown sugar and sprinkle topping over cake batter
  • Bake at (preheated) 350 degrees for 45-50 minutes
  • Enjoy!

Friday, February 15, 2013

Preschool Theme: The Very Hungry Caterpillar


What mom & child doesn't love The Very Hungry Caterpillar? We have a couple different versions of this book and it a favorite.

Kids are also fascinated to this introduction to metamorphosis and it would be a wonderful opportunity to purchase one of the InsectLore Live Butterfly kits; we have done them 3 years in a row and also raised monarchs.


Here is the list of Activities, Projects and Crafts we did:


What have you done to help your child learn about caterpillars?


Thursday, February 14, 2013

Thrifty Thursday: Make Your Own Preschool Worksheets


Unless you are able to purchase Dollar Store workbooks, it can be quite spendy to purchase workbooks to do preschool at home. Consider printing off your own at home or drawing out your own.

Printer ink can be drained fast if you are printing a lot, so if the worksheet is something you can quickly make on your own with a marker, then  do it.

Sometimes I make my own worksheets just so I can avoid using more ink, like in the caterpillar project above. I made a big C that my son first had to trace and then glue on pompoms, googly eyes, and craft foam head to make the caterpillar, that way I got more use out of one worksheet. Some of those pompoms  were reused art supplies from a previous project and I will reuse the ones that can be when this project had been hanging in our home long enough and it is time to swap out projects.

Other times I make my own worksheets is out of necessity when my son requests a particular theme that no one else has made worksheets of (or even though of as a preschool theme.) LOL!


Guess Whoooooo Loves You?

OK, I wish I would have written down what I did to make these because I didn't follow a pattern and I had made the majority of these cute little owls loom knitting over a couple evenings with the exception of the feet, which I waited 2 weeks to do and then forgot how many rows I had done for each part and don't really want to figure it out, but wanted to share the idea with you anyways.

I used the Knifty Knitter 10" long pink loom to make all the parts and I needle felted the hearts.  I used all the pegs on the loom to make the body of the owl and then only 5 pegs to make the ears and wings (with decreasing to make the tips) and 6 pegs to make the feet (although I think if I made the feet again I wouldn't make them as long.)

And then I made a card for each of the kids using this image, and gave them a box of candy hearts.


Tuesday, February 12, 2013

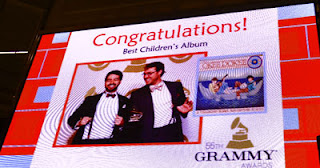
Wordless Wednesday: And the Grammy Goes To...

Toddler Tuesday Concert at the Mall of America by New Grammy Winners:


Try It Tuesday: Balloon Print Caterpillar

This will be your first introduction to the Preschool Theme for this week, which is "The Very Hungry Caterpillar". That post will be live on Friday and you can get ideas for a variety of activities, crafts and worksheets to do that preschool theme at home.

 My son had a great time with this project because it was fun to paint with something out of the ordinary. I blew up 2 water balloons (one red & one green so he was easily able to know which paint to dip it in) and had him start with making the head of the caterpillar followed by prints for the body of the caterpillar.

Next I let him glue on on googly eye and some antenna that I cut from some craft foam.


 Finally, I had him draw on the caterpillar legs. I got a kick out of watching him draw all the legs and he was trying so hard to draw them the same length.


Monday, February 11, 2013

GIVEAWAY and Review: Madeleine Peyroux CD


I had the opportunity to review the video of Changing All Those Changes from Madeleine Peyroux, a Brooklyn-based jazz singer-songwriter/guitarist and want to share it with all my readers! Changing All Those Changes is the album's first single and video and originally was a Buddy Holly song.

I have to admit that this was my first time listening to Madeleine Peyroux and enjoyed Changing All Those Changes quite a bit. Her voice is very soothing to listen to and has been compared to being a modern-day Billie Holiday. I am looking forward to reviewing the rest of the album and hearing more of her voice. After I watched the video (below), I did listen to some other videos of her on YouTube an really found her voice to be very comforting. I just want to sit back and relax with a glass of wine while I listen to her music.

After you finish watching this video, make sure you sign up to win a copy of the Blue Room CD. You have the opportunity to win with 2 different giveaways!

If you are interested in seeing Madeleine Peyroux perform live, then  check out her tour dates. The Blue Room CD will be released on March 5th and her worldwide tour will start on March 7th in New York. I am excited to tell my readers that she will also be performing in the Twin Cities at the Dakota Jazz Club on April 2-3. Please check out the Dakota Jazz Club website for more information about the show and to purchase tickets. Keep an eye on her website for any additional tour dates.


ABOUT MADELEINE PEYROUX'S THE BLUE ROOM
Madeleine and longtime collaborator / legendary producer Larry Klein (Joni Mitchell, Herbie Hancock), re-examine Ray Charles’ classic, and one of his most controversial albums, Modern Sounds In Country And Western Music.
But instead of replicating the album, Madeleine and Larry represented the artistic freedom Ray exhibited, using imagination to break down musical categories and barriers.
What Madeleine and Larry created is a sophisticated album rich in strings, pushing the power of Madeleine’s vocal capabilities – her melody changes, choices of tone and phrasing. The Blue Room explores new ground, showing that like jazz itself, Madeleine is willing to take new chances – reinterpreting songs with an emotion and depth that can’t help but touch the soul.
“I didn’t want to just do a straight forward covers album,” says Madeleine. “When Larry first brought this project to me, I was so moved by what I heard that it truly inspired me to both reinterpret these songs while also merging them with others that I thought fit perfectly.”

 *****

Would you like a chance to WIN A SIGNED COPY OF THE BLUE ROOM? Then send this e-card to someone with a personal message and you will be entered!


ONE LUCKY READER WILL WIN THEIR OWN COPY OF BLUE ROOM 
FROM SAVE GREEN BEING GREEN. 
(This copy is not signed like the giveaway like above, these are 2 different giveaways.)
ENTER RAFFLECOPTER FORM BELOW


a Rafflecopter giveaway

I was given a copy of the CD for the purpose of review. No monetary compensation was received. All thoughts and opinions expressed are my own. Save Green Being Green is not responsible for product fulfillment. Winner must reside in the US or CA.

Make It Monday: Chocolate Cherry Berry Bread

I used a bag of frozen Very Cherry Berry Blend (from Trader Joes) but you could use your own blend of frozen berries or cherries. This is another tasty clean eating recipe. I found that there were a lot of clean eating banana bread & zucchini bread recipes out there, but not as many other kinds of quick breads, so I needed to make my own. Of course, please still do try my clean eating Blueberry Banana Bread and Zucchini Bread Recipes. 


Chocolate Cherry Berry Bread
2 C whole wheat flour
2 tsp baking soda
1 tsp cinnamon
1/4 C organic baking cocoa
3/4 C raw sugar (honey or maple syrup works too)
1 C Very Cherry Berry Blend, frozen berries
2 T coconut oil, melted
3/4 C natural apple sauce
1 whole egg
1 egg white
3/4 C greek yogurt, plain or berry.cherry flavored
1/4 tsp almond extract

Directions


  • Preheat oven to 350 degrees F
  • Spray 1 large loaf pan.
  • In a medium-sized mixing bowl, whisk together the flour, baking soda,cinnamon and cocoa.
  • In a large mixing bowl, whisk together the sugar, apple sauce, egg and egg white, coconut oil, extract and yogurt. Mix well.
  • Using a wooden spoon, stir the flour mixture into the wet mixture and blend well. 
  • Fold in cherries/berries.
  • Pour the batter into the loaf pan and place in the oven.
  • Bake for 50-60 minutes or until a cake tester comes out clean.
  • Cool & Enjoy!

Friday, February 8, 2013

Preschool Theme: Snow


I know I have done a playdate theme on Snow before, so you can check that out for some additional ideas, but I wanted to share all new ones with you.

Here are the Activities, Worksheets and Projects we did for this theme:


Be sure to also check out my other ideas from our Snow Theme Playdate. 
 
Or try out some of my other Snow Ideas: