Showing posts with label painting. Show all posts

Friday, February 16, 2018

Thinking About Painting Your Home This Year? Check out this FREE Class!!!


Learn all about the new tips and techniques in painting and find out the hottest colors in this FREE Class TOMORROW at Home Depot. Get Signed Up today!

Tuesday, December 26, 2017

Drawing and Painting a Goldfish

This was a fun project that we did by following a tutorial on Pinterest. As you can see, we all ended up with something a little bit different and my son took the idea and expanded to further to make an Angelfish instead. You can try drawing Goldfish like we did with this tutorial on The Drawbot.

Thursday, September 28, 2017

Dining Room Table Turned in to a Vanity


Here is the before picture. As I was taking off the hinges for the leaves, it dawned on me that it would be nice to have a before picture. So, it is upside down but you can see how big the table originally was and you can see the orientation of the table legs. I didn't want it to be this really long vanity and as luck would have it I could remove the sliders and reattach the legs to the short sides. I removed the leaves that fold up, they are great pieces of solid oak, so you might see them re-purposed in to some other project down the road. My husband did have an idea to use one of them.

***finally finishing post 2 years later***

So finally I will be finishing this post that I started over two years ago. I was looking through any drafts I had a post and came across this one.

As you can see the vanity is well used and loved. I ended up sanding it and painting it and covering the top with a faux marble contact paper. It has stood up for two and a half years of use and continues to work well. My daughter doesn't use it so much as a vanity yet but uses it as a place to do artwork and displays a variety of her art and craft pieces above it.

I had also sanded and painted a chair to go with it and recovered it. I use the same fabric to recover this chair as the one I had done for her years ago which is still in great condition but doesn't have room in her room for it currently. Someday when she is older she will appreciate that she has furniture that is all painted the same color and his matching that way.

Thursday, January 12, 2017

DIY Cabin Sign

I made this cute sign to go inside of our cabin. We have some other moose decor and so I chose to continue with that. I used my Silhouette machine to print off sticky vinyl and place it on top of a canvas that I had painted. Then I lined the outside of the painting with black gaffer tape I really like how gaffer tape finishes off the outside of a painting

Wednesday, September 2, 2015

Wordless Wednesday: Paint Party at Upper East Side

Summer is wrapping up for most and the kids may be back at school already or next week. So, why not think about a fun MNO and plan a paint party like the one I did with a bunch of friends at The Upper East Side in Faribault, MN.


Tuesday, July 28, 2015

Outside Foot Painting - Crazy Messy Fun


Remember the Messy Twister we did a while back, well, we had some more messy fun. The outdoors is great for messy projects because you can just wash it away.

I got out 4 different baking sheet pans and put washable tempera paint on them. FYI - even though tempera paint says it is washable I do not recommend letting kids wear their nice clothes because it has been known to set in a bit and leave a stain.

We held down big sheets of paper with some rocks from the landscaping.

Then I let the kids have at it creating sunflowers with their feet. Of course they are kids and these ones don't mind getting messy, so they started using their hands as well. Before I know it my daughter was done with her picture and started getting her hands and feet full of paint to do cartwheels in the driveway so she could see the prints it makes (cartwheels seems to be her preferred mode of transportation these days.)

Thursday, July 23, 2015

Painted Landscaping Bricks at the Cabin


Here is a fun and thrifty idea. We did this as an extended part of my daughter's Art Birthday celebration and did these with family at our cabin. The ones pictured here are all of ours and are at our cabin. We each did 2 of them and helped brighten up the entry path to our cabin front door. We didn't really have a clear path before so we tore our a bush that had overgrown it's spot there (I replanted it somewhere else with more room.)

So, you can see we have an eclectic grouping of painted bricks (they are pretty inexpensive) that we painted with acrylic paint. My husband painted a boat and lake scene and then his name with a fishing bobber. I painted my name and an American flag. My daughter painted her name and then the "Cabin" brick (she painted everything but the word, which I did). My son painted the truck and let me paint his name one which I did in Minnesota Vikings colors and style of letters. I think they turned out great!

Tuesday, November 18, 2014

Hand Painted Decorative Tile


This was a fun project that I had planned to do with a friend. We used to have crafty playdates with our kids (well, we still do it just needs to be after school) but I decided one day we need a crafty mommy date and these are my hand painted decorative tiles.

The tiles were from Lowe's for under $1 each and we used acrylic paint that I already had in my supply and high gloss lacquer that I had leftover and glue leftover felt to the back as well as a wine cork as a stand.

To make these I just prepped the surface by wiping it down with soap and water and then drying it. Then we painted our images on the tile with acrylic paint. When that was paint, we put 2 coats of high gloss clear lacquer on the tiles, allowing it to dry between coats.

My new decorative tiles now reside at our cabin. I thought the color fit in perfectly there, plus I needed some more room decor.

Tuesday, October 7, 2014

Deer Antlers Paint Craft Project using Gaffer Tape


I just made this Deer Antlers Wall Hanging yesterday and I didn't want to wait to share it with you. It looks even better in person and I know it just going to look awesome hanging above the mantel of the stone fireplace at our cabin up north.

I was looking for an idea on how to use GafferPower gaffer tape since I couldn't find anything right at this moment to try it out for it's original intended purpose to hold down wires and secure cables. I hope to use it when we seal up around the AC units at the cabin too since it can handle outdoor weather and range of temperatures. So, a new idea must be developed to be able to review this gaffer tape.

Below I have included a series of pictures to show you the steps I took to create this art piece.


I started out by drawing a rough sketch on a piece of paper. I determined my measurements by centering the piece and working out from there to determine each individual measurement. I made this on a 16x20 canvas, so you if you plan to use my work as inspiration you can click on the above picture to see what my measurements were and use it as some guidelines.


My next step was to use a ruler and draw out all the lines on the stretched canvas in pencil.


After drawing the image on the canvas, it's time to apply the GafferPower gaffer tape. The tape tears easily and so I could make 1" wide strips without having to make cuts this way.

Product Description from Gaffer Power:


Gaffer Tape is used by professionals working in the Arts and Entertainment Industry
Premium Grade Gaffer Tape:
-It's tough, powerful and secures cables tightly
-Holds down wires to podiums and stages
-Removes quickly and cleanly
-Leaves no gummy residue, uses high quality synthetic rubber
-Can be quickly torn into neat strips and used without other tools
-Non reflective, blends it perfectly with the background
-Does no harm to whatever the tape is applied to
-Excellent flexibility Great for around the house! Gaffer Tape has lots of other uses:
-Can also be used for bookbinding, repair tape, wrapping, bundling, protecting, protecting wires, sealing tape
-Can handle outdoor weather and a range of temperatures
-Gaffer Tape is a must for anyone who wants great quality tape


Here is the backside of the gaffer tape where the sticky part is. I used a ruler to cut the measurements I had written on the piece of paper.


Next up - I applied the gaffer tape on on the canvas. I was able to adjust the pieces and pull them up and they did not leave a sticky residue. Then in was time to apply the paint. It was easy enough to not paint the tape because it made a bit of a raised ridge on top of the canvas. Below is a picture of all the paint colors I used, with the black on the left for the center of the piece and the remaining paint colors were painted as the background.


I also used the gaffer tape to finish off the edges around the perimeter of the canvas. I tore the gaffer tape down the center likes I did on the deer antlers and then cut off the gaffer tape at 16" and 20".


I received one or more of the products mentioned above for free using Tomoson.com. Regardless, I only recommend products or services I use personally and believe will be good for my readers.

Tuesday, April 8, 2014

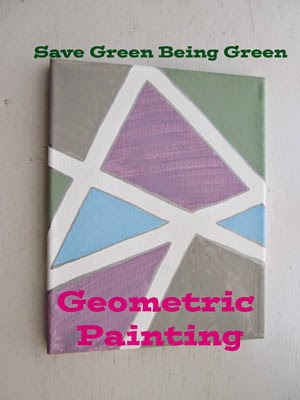
Try It Tuesday: Geometric Painting


I am a crafty person, but not an "artist". Sure, I like my Wine Paint Pubs but the way I figure if those turn out completely awful I can blame it on the wine. But this painting is more crafty in nature and was a fun weekend night project for my daughter and myself.


To start out, just place strips of tapes in any desired form on a stretched canvas and start painting away using acrylic paints. Allow paint to dry before removing the tape. Remove the tape carefully. Final step we did was to trace the edges with metallic permanent marker. By tracing the edges you cover up any spots where the paint leaked under the tape and give it a finished look.


This one was my daughter's. I wasn't sure about her choices, but she is 7 and knows what she likes and not afraid of bright colors and mixing colors. I had to admit I wish this one was mine. I thought the color choices turned out brilliant.


Mine is more subdued. When did I become so afraid of bright colors. I have been adding them back in with my workout clothes but I do like them and am trying to bring them back in to my life more.

Wednesday, February 5, 2014

Wordless Wednesday: Owatonna Art Center Paint Pub

Another Paint Pub at the Owatonna Art Center is complete and you can see what we did there. We were given a famous painting to look at and paint it with our own twist, all while enjoying some wine and fabulous company. My piece is not quite complete as I still want to add some shadowing to the flowers, buy you can see it as it is so far. If you want to see the other 2 times check out these:


The other "Pub" type class I attended was this Book Arts Class or you can check out all My Pottery Creations that I have made there or read my Hand Behind the Wheel Post about when I took a 7-week pottery class there.

Wednesday, August 28, 2013

Wordless Wednesday: Paint Pub at Owatonna Art Center

This was a fun activity to do with a bunch of girlfriends and introduce them (many of them for time) to the Owatonna Arts Center through this Paint Pub. This top painting is mine. I am not a painter, but I am happy with my project.


Tuesday, February 19, 2013

Wordless Wednesday: Paint Pub

Paint Pub at the Owatonna Arts Center


Try It Tuesday: Paint & Stick Art Canvas


This was a fun project to do with my son. I think it's pretty good work for a 3 year old! I have found that kids get super excited when you let them paint on a stretched canvas. It is a magical medium to paint on because normally only "artists" use a canvas and things on a canvas stay up a lot longer in a home than something just on a piece of paper. The kids have each painted a couple things before on canvas and they hang in their rooms and they are very proud of these works of art.

I bought a 10-pack of 8x10 stretched canvas at Michael's craft store a few months ago for $10, so each one cost me $1. We used paint and brushes that we already owned. The "stickers" are a raised cardstock quality picture with a foam sticker on the back, I bought that sheet from the Dollar Tree. He didn't use all the stickers and later we will make a couple cards using the remainder.


I had him start out by painting the entire canvas in blue and then we let it dry and did some pirate worksheets in the meantime (check back on Friday for my Preschool at Home Theme on Pirates to see what we used). Then I had him paint in the sun, clouds & island.


When it was mostly dry (we were just impatient, but you could wait until it was completely dry) I let him pick out what stickers to use and where to place them.

He was super excited that he has a new painting for his room. When we were finished he asked for a snack of crackers because parrots eat crackers and pirates have parrots. Smart boy!