Friday, March 30, 2012

Fix-It Friday: Couch Seam Repair

The culprit - a seam that has torn loose on my couch. Easy enough fix, but  takes a little time.
You do need to remove the cover from the cushion (and might as well wash it since it is off) to be able to sew the seam shut.

Minimal supplies are needed: upholstery thread, a heavy duty needle and scissors.

Here is what it looks lie from the inside of the cover. Be sure to push the plastic cording back in straight.

Hold & stitch! Be sure you have a heavy duty needle, otherwise it might not  be  able to be pushed through the upholstery. If you line the fabric back up right, you may be able to push the thread through the existing holes created from the original stitching.

Turn the fabric back with the right sides out and insert the cushion back in the cover (this will probably be the hardest part of this whole thing as you have to squish the insert and push and line up edges.) 

Thursday, March 29, 2012

Re-Seeding!!! Woohoo!!!

 I love it when gardening is made simple, easier & cheaper! Re-seeding can do just that!

Some plants are goo re-seeders and others are not. Sunflowers (pictured to the right) can be if the birds do not get to all the seeds. We like to grow sunflowers because they are pretty; we are fascinated by how tall they grow; and we want to provide a source of food for the birds in the winter.
 Another hearty re-seeder is lettuce and greens. I can tell which are the lettuce plants in here, but this is also the location where I had planted greens later in the season last year. Spinach was also planted nearby as well, as were radishes.

Below are some radishes (and a lettuce plant) that re-seeded themselves. I have found that radishes are very easy to re-seed.

For some, re-seeding will not happen because they like to pull the plants as soon as they are finished (or eat them all) and not give them time to go to flower and re-seed. The benefit of pulling the lettuce & radishes is that you can get new ones in the ground right away, as neither have a long growing season and if you replant as soon as one crop is finished you can get 2-3 crops in your growing season.

But you could just allow your last crop to go to seed. I tend to get busy with other gardens we have that I let the first crop go to seed and then only have time for one more crop once I get back to tending to these.

Of course, it is so NOT normal to have these poking through at the end of March in MN. I was just thinking that I needed to get out there and work up the raised bed that I generally plant lettuce, radishes, peas spinach & greens in. Now, I need to thin out the area that re-seeded and fill in other areas with spinach & peas (which this is the perfect time to get those in the ground in MN.)

And since so much is already up, I will have to pay attention to the nighttime forecasts and cover as needed. I did check another garden that we put some pumpkins on to compost back into the ground in hopes that would re-seed itself. Our inspiration for that came from the book Pumpkin Jack in which their pumpkin re-seeds itself. The seeds are there surrounded my mulching leaves and pumpkin parts, so it still might happen, but it hasn't yet.

Wednesday, March 28, 2012

Wordless Wednesday #8:


WINNING Wednesday; Green Kids Crafts and A Happy Green Life

Congratulations to the following winners on Save Green Being Green! Entries have been verified and emails were sent to the email address provided through Rafflecopter. Winners will have 48 hours to reply with their full name, address & phone number (& any other information pertaining to the contest) in order to claim their prize. Failure to reply in the time allotted will result in a new winner being chosen.

Green Kids Crafts: Kona S.

A Happy Life Laundry Wash: Nancy D.

Monday, March 26, 2012

Make It Monday: Kale Chips


GIVEAWAY and Review: Perfect Pet for Peyton (Book)

I recently had the opportunity to review A Perfect Pet for Peyton: A 5 Love Languages Discovery Book. It is a hardcover book with beautiful colorful illustrations printed on thick glossy pages. This book has a very nice quality feel to it and would make a wonderful gift. This book is based on the books The 5 Love Languages: The Secret to Love That Lasts and The 5 Love Languages of Children (Stay tuned! I will be doing a review and giveaway on this book in April!). 
On each of the set of pages, kids can search for a hidden insect. Also on each set of pages during the first half of the book, kids are asked to identify a variety of animals that are found in each section of the Perfect Pet Pal Emporium. The last 2 pages of the book also include a series of questions for discussion. This is great to help you start a discussion with your child about this book, or it would be suitable to use this book at Sunday School and use to facilitate discussion among the students.

My daughter and I both enjoy this book and had a great time completing the activities and discussing how she likes to have love expressed to her & how she expresses it to others. You can find A Perfect Pet for Peyton ONLINE.


*Free interactive app with in-book experience COMING SOON to the Apple App Store.

One Lucky Reader Will WIN Their Own Copy of This Book!


GIVEAWAY and Review: Wholesale Halloween Costumes

 I was very excited about the opportunity to review toddler costumes for Wholesale Halloween Costumes. You may have noticed that in some of the project tutorials I have done with my daughter she has been wearing a costume of some sort or another. My children love to dress up in costumes, but I am afraid that the majority of our costumes (and we have plenty!) are more along the lines of girl costumes and we were in great need to add another boy costume to the mix for my toddler son.

I started looking through the costumes and was immediately drawn to the dinosaurs and thought that this Triceratops was a must-have!!! Although I was quite tempted by the Raptor dinosaur costume as well. And how could I forget the Thomas the Train costume that would have been a hit with him too. I think he would have been excited about just about any costume I would pick out for him.

The quality of this costume is outstanding. He will be able to play with it for a couple years and it will still be in good condition to pass on to a friend when he outgrows it. The fabric is soft and it has velcro closures. The feet have elastic on the bottom so that they can wear their shoes with this. And what I really love is the hands! He can have them out or he can slip them inside and have them fully covered (which is great for TOTing in MN when you have no idea what the weather will be like on Halloween.)

This costume is sold on their website for $25.90, but I have seen costumes on there for as low as $4.90 for a Kung Fu Panda costume or $9.90 for one of the following costumes: Dr. Suess Who, Gonzo, Shrek the 3rd Baby Donkey (this is so cute!) or a Girls Harley-Davidson costume.

Wholesale Costumes also has costumes for women, men, couples, kids AND PETS. They also carry masks, wigs, accessories, props, and makeup. And they also have costumes for holidays such as Valentine's Day, Mardi Gras, St. Patrick's Day, Easter, Fourth of July, Thanksgiving and Christmas.

And what's more!!!! 

One winner will receive a $25 gift certificate to Wholesale Halloween Costumes!!!!


Sunday, March 25, 2012

Review: EASTER CULINARY CREATIONS…SAVORY SIDES


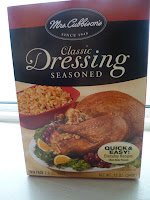
I had the opportunity to review Mrs. Cubbison's Classic Seasoned Dressing and Caesar Salad Croutons and prepare an early Easter Dinner for my family. The  croutons, I served on a colorful salad of mixed greens, strawberries, red onion, and sliced almonds and our favorite salad dressings.


The dressing I prepare in a way to make it more colorful and festive by adding 3/4 C of pineapple chunks and 1/2 C dried cranberries (you could add dried cherries or strawberries instead). The recipe also called for 1/4 C bacon bits, but I chose to leave those out as I wanted more of the fruit flavor to come through. Add the above ingredients to one (of the two) packets enclosed in the box.

I served these savory sides along with some ham, asparagus and deviled eggs.

Both items are very flavorful and need minimal preparation and can help you have have Easter dinner on the table very quickly. By using a pre-cooked ham and boiling my eggs this morning while I made breakfast, I had our Easter dinner prepared, baked, and served within 45 minutes total. I plan to make this stuffing and this salad when we celebrate Easter with my extended family over Easter weekend.

For more tasty Easter menu ideas, visit www.mrscubbisons.com.

Another couple of ideas to make a fun, decorative savory side are:

EDIBLE EASTER STUFFING CENTERPIECECombine 1 box (2 bags) stuffing mix with ¾ cup chopped celery, ¾ cup chopped onion, 1 cup broth, juice or water, ½ cup canola or vegetable oil and 2 large eggs, lightly beaten. Press moistened stuffing firmly into a greased Bundt cake pan and bake in a preheated 375° oven for 30 minutes. Allow pan to cool before turning out onto a serving plate. Fill the center with shredded cabbage and add colored Easter eggs.
STUFFING EASTER EGGS! Using the same recipe above, shape the moistened stuffing into egg shapes and arrange on a cookie sheet with a light coating of cooking oil spray; bake stuffing “eggs” in a preheated 375° oven for 15-20 minutes, or until golden brown. Serve stuffing eggs with shredded cabbage “grass” beneath them or in a colorful linen-lined Easter basket. 


You can also find Mrs. Cubbison's on Facebook!

Check out the video I made of me talking about the food I prepared for our (early) Easter Dinner.


I received one or more of the products mentioned above for free using Tomoson.com. Regardless, I only recommend products or services I use personally and believe will be good for my readers.

Friday, March 23, 2012

Fix-It Friday - Repairing Wooden Screw Holes

Do you have a screw that won't stay in it's hole in the wood? Has the wood been stripped away?

Remove the Screw from the wooden area where the screw has stripped away the wood.

This is the after picture, but the center where there is the white  circle is the filled in hole. So, how do you fill in the hole, you ask. Just take a toothpick, dip the end in wood glue, stick glued end in the hole and break it off so that it is close to flush with the wood. 

Then immediately screw your screw back in the "hole", no need to  let it dry. Be sure to use regular wood glue (not  Gorilla glue that I used last week, because that will expand.)

By using this technique we fixed the latches on 3 cabinets that have come loose and a doorknob. I love that it was a minimal amount of work (even more minimal for me since my husband did most of this) with supplies we already had in the house.

Thursday, March 22, 2012

New Lowe's Build & Grow Website & April Clinics

April 14, 2012 Build & Grow
 The Lowe's Build & Grow Website has been revamped and launched and I have to say that I am thrilled with the changes. The images and feel of the new website are very pleasing and very kid friendly to look at. They draw you in with the bright colors and cartoon images.

There are several features on the website that make it more user-friendly and interactive. By far, my favorite is that you register with the site and it REMEMBERS you! No longer do you have re-type in all your info. Just log in and select the kids you are registering. That's it!

Also, when you go to register for a clinic it tells you how many spots are available at all the nearest stores, which is good to know so you aren't wondering if you wait if you will get in.

April 28, 2012 Build & Grow
Another feature I love is that they have the Full Schedule available which tells you ALL the dates (as of this post) thru August 25,2012. I know we like to attend as many as possible and I like to put them on the calendar even if we don't know what the project is just I know that is an option for us to attend on those days. They even have the names of the projects listed for May (Picture Frame Planter & Ice Cream Truck). Think Mother's Day Gift with that Picture Frame Planter. However, you can still only register for the two soonest clinics.

Two other new features on the site are that they have family projects featured, that link back to their Lowes Creative Ideas website. This "Dream Castle" Bookcase is one of the family projects featured. I love that they are sharing these family project ideas with us now. I always checked that box to email me with ideas when I registered before, but I never got anything. The other project featured is a Bowling Activity.

They also added link/pictures to other project kits that you can buy. And remember, you can always order items online from Lowe's to be picked up from the store. They range in price from $5.78-$8.98.

And finally, they are creating a Community with a link to a FB page for the Lowe's Build & Grow Clinics.

There is a Build & Grow coming up THIS Saturday, which is not on the new website (it was on the old one) so if you would like to see if there are spots available at your location you will need to call the store.

These clinics are becoming more & more popular, so don't wait too long to register. I tried to register my kids for this current one 2 weeks ago (on the old site) and it was already booked up at my closest store.

TV-Free Activities on Northern Cheapskate


Head on over to Northern Cheapskate and read about the 5 ideas I have for you for TV-Free Activities for your Kids.


These are just two examples of things I present.

Wednesday, March 21, 2012

Wordless Wednesday #7: Signs of Spring

Which is Your Favorite Sign of Spring?


Winning Wednesday: Tiny Prints Address Labels, La Bella Stella CD, Woodcarver DVD

Congratulations to the winner of the following giveaways! You have 48 hours to reply with your full name, address, & phone number in order to claim your prize. Emails have been sent to the email address provided on the Rafflecopter form.

Tiny Prints Address Labels: #5 Heidi


La Bella Stella CD: #144 Lauren


Woodcarver DVD:  #70 Diana

Tuesday, March 20, 2012

Review: Waterpik SinuSense

 I had the opportunity to review the Waterpik SinuSense with my family. It came at the perfect time because we just got head colds. My husband who frequently uses other types of sinus flush products said that it has significantly more pressure than the other products and will really flush out your sinuses.

It was very easy to fill and use. The only design flaw it has is that you are unable to get all of the water out because of how you have to hold it, so you may have to add more water.

This product doesn't even have to be plugged it. It is battery operated and it comes with the AAA batteries needed for it. It also comes with 15 saline packets that are infused with eucalyptus and aloe vera extract to help wake up your sinuses and soothe them at the same time.

Coupons for a variety of Sinusense products are available HERE.


I was gifted with this product for the purpose of review. Compensation was received to write up this review, but all thoughts, opinions, photos, and videos are my own.

Try-It Tuesday: Easter Egg Craft

Try Out This New Idea for an Jelly Bean Filled Easter Egg

My daughter & I did this project together. We made the 2 eggs pictured below to put in the (Easter) basket that her class was providing for the school carnival's silent auction. (I also made a couple other items that were included as well.)

I bought a small bag of jelly beans (50-cents), used leftover yarn and some pieces of craft foam and some clear plastic table sheeting (find at a fabric store where they sell table {oil cloth} fabric). I paid 24-cents for 1/4yd. and could probably make 10-12 eggs from it.

Cut out an egg shape from craft foam and clear sheeting. Holding them together, punch holes around the perimeter. Then "sew" the yarn through the holes (this is a great step for kids.)

Don't sew the last couple holes quite yet. Leave them open to put in the jelly beans (another good step for kids), then sew the last couple holes and tie the remain string in a bow at the top.

So, we made these two for the carnival basket, but my daughter has asked that I make these for her & her brother, so guess I will be making a couple more.


Monday, March 19, 2012

GIVEAWAY & Review: A Happy Green Life Laundry Detergent

I was given the opportunity to review 4 different scents of Natural Laundry Wash from A Happy Green Life.  The scents I chose were: Doodle Bug, Green Irish Tweed, Pink Sugar, and Butt Naked (this scent is available ONLY from Mud Butt). Are you as intrigued by the names of these laundry washes as I was. Go check out all the SCENTS. Here are the descriptions of the scents I chose:

Doodle Bug: A blend of cream soda, fresh watermelon slices, hubba bubba bubblegum, with a hint of newborn baby.

Green Irish Tweed: A sexy fragrance that will have you screaming, "I want my man to smell like that"! Spicy-sweet blend of French verbena and lemon, a green Florentine iris and violet leaves, and sublime notes of Mysore sandalwood and ambergris. Ooo..laa..laa


Pink Sugar: A fruity blend of cotton candy, lemon drops, caramel and raspberry jam on a dry down of musks.


Butt Naked: The tantalizing base note medley of granny smith apples and honeydew melon, middle notes of strawberries and pears, with hints of spice.


Laundry detergent is not the only products they carry. They also neutralizing powder (think stinky garbage cans and diaper pails!), kitchen soap, aroma spray, bouncing woolies (for your dryer instead of fabric softener or dryer sheets), un-paper towels and cloth wipes. They also have a long list of items that they will soon be adding to their product line including reusable snack bags, dishwasher detergent and stain remover, just to name a few.

And if you like to mix things up a bit, Sign up for their Scent of the Month Club. Or if you want to try out some scents before you commit to buying a 50/100 load container, then think about buying Samples.


Enter Below to WIN a Sampler Pack!

I pretty much exclusively use natural laundry detergents for all of my laundering needs, so this product was a perfect fit for me to review. And being the thrifty person I am, I always compare prices. The price for their laundry detergent is right in line with what I pay for natural laundry detergent, but the advantage with buying this product is you are supporting two work-at-home moms (which I can totally relate to!) who are trying to make the world a little greener.


You can find A Happy Green Life online at:


Make It Monday: Yogurt Cheese

Before - it's still yogurt!

I am not sure why I had never heard of this before beginning my journey with clean eating, but now I know and have to share it with my readers that may not know. Yogurt cheese is traditionally used as a substitute for sour cream or cream cheese. It's simple to make and you can customize the thickness.

Directions:

To make it, line a colander with 2 layers of cheesecloth or coffee filters. Pour in your low-fat plain yogurt on top of the cloth/filter and allow to drain for 1-12 hours. Cover with some plastic wrap and place in the refrigerator for the desired length of time.

The length of time you allow it to drain depends upon what you want to use it for. If you are using it as a substitute for sour cream you will drain the whey off for a shorter period of time, longer for a cream cheese substitute.

* I found that no matter how long I left it I still had a sour like consistency. I used non-fat plain yogurt and may try it with Greek yogurt and see if that makes a difference in the consistency. I do like it as a sour cream  substitute.

Whey that separates out.

Sunday, March 18, 2012

Review: Waterpik Ultra Water Flosser

The Waterpik Ultra WaterFlosser which is faster, more effective, and less painful than regular flossing. Retail value of $59.99 

This was another opportunity I had to review an alternative to string floss, which I don't use because my teeth are very tightly packed (can't say spaced because that would indicate there may be some space between my teeth, which there is not!). I reviewed the Waterpik Ultra Waterflosser and am going to share my thought about the product, some pictures, a video on how to set it up and a video on how to use it.


How to Set Up Your Waterpik Waterflosser

This product was very easy to set up. After you have removed all the packaging, just fill the reservoir with water, snap it in to place on the top and add the cover. The snap the desired attachment in to the handle. That's it! Easy!

You can find out more information about attachment in the manual that comes with it, so don't be overwhelmed that there are 6 attachments. You will probably gravitate towards one and just use that one all the time.

How to Use Your Waterpik Ultra Flosser

Using the Waterpik Ultra Waterflosser is just as easy as setting it up. The first time you use it you need to prime (take 1 second, seriously!) and the first time or two you will figure out what setting you want it at (1-10, 10 being the highest). I like it at a 5 (so far, but I think I might try it at 6 tomorrow). Just put the attachment in your mouth THEN turn it on. Let the water drain out over the sink as you spray the water in your mouth along your gum line and between teeth. I honest think this takes me half as much time to do compared to using string floss (it is really a long of work with string floss to push & pull between those tight spots.) I do plan to continue to use this. My husband has been asking to try it too and he can choose one of the other attachments and give it a whirl!


Compensation and product was received to complete this review. All thoughts, opinions, photos and videos are my own.

Starting Seeds Indoors Round 1


It's mid-March, so planting season is among us in Minnesota. Well, only if you intend to start seeds indoors. Some seeds require approximately 8 weeks indoors before being transplanted outdoors, which is what is making up Round 1 of my planting. For me that basically consists of tomatoes and peppers and a few odds & ends I thought we would try this year.

Around Earth Week, I will plant Round 2. Those will be seeds that only require 4-6 weeks indoors. I usually plant items in my pots and raised beds (which are easier to cover) about mid-May, and then wait to plant the bigger garden until the end of May.


Rows:
1 Bandit Leek
2 Paprika Alma Pepper
3 Criolla Sella Chile Pepper
4 California Bell Pepper
5 Heirloom Thai Yellow Egg Eggplant
6 Marquesa Onion
7 Chancha F-1 Tomato
8 Dr. Wyche's Tomato
9 Yellow Brandywine Heirloom Tomato / Echinacea Purpurea White Swan Coneflower
10 Red Cherry Tomato
11 Sweet Marjoram
12 Petite Orange Marigold

The eggplant, onion  & yellow tomato call came from a seed sharing program last year. I couldn't find information about the Marquesa onion online, so I don't know what the planting information is but I thought since I had an extra row I would go ahead and start them indoor now. The yellow tomato only had a few seeds, so I only planted have the row with those and then planted some echinacea seeds (not pictured) in the other half.

The marigolds don't really need to be started indoors this early, but I like to put some in pots by the house early in the season. I will plant more marigolds in Round 2. So, be on the watch for posts from Round 2 and also our annual Earth Week Plating playgroup.

Plus, we do have our tomato (Truffula Trees) plants that we started with my son's playdate and my daughter's classroom (which I will be going back to her classroom to help them plant another item,.)

As well, as our pomegrante seeds FINALLY sprouted. We were about to give up on them after a month, but then we forgot about them and they finally sprouted and now we have transplanted them to a small pot, from their cushy paper towel.