Showing posts with label fairy. Show all posts

Tuesday, December 24, 2013

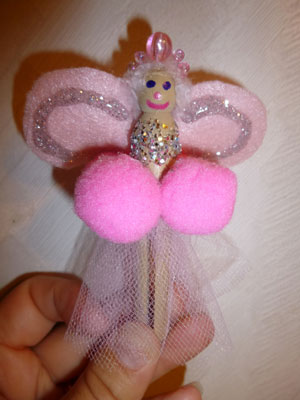
Try It Tuesday: Pink "Sister" Peg Doll Fairy


This is one of the gifts that my son made for his sister for Christmas. He wanted to make sister in to a fairy doll, and he certainly captured it with the choices of fabric we made.

I bought pegs that were already painted and had him draw on a face with permanent marker. We did use a hot glue gun, but I operated that while he cut all the materials according to my directions and he carefully put them on the hot glue. He knew to be careful! :)

This is a perfect addition to her collection of other homemade peg fairy dolls that include:


Tuesday, May 21, 2013

Try It Tuesday: Barbie Fairy Cake


This is the cake that I made for my daughter's 7th Birthday Party. I have mentioned before how we are huge FAIRY FANS in this house, so it only makes sense that we finally had a fairy themed birthday party. I will share more about everything we did for the Fairy Party in another post, but I wanted to share the cake with my readers right away.

I made this Barbie Fairy Cake for her, you can see the other cakes I have made on Northern Cheapskate when I taught myself how to make & work with fondant.

To make this cake I made 2 round cakes and split them and arranged them as you see above. I then made homemade fondant (tastes so much better and cheaper than pre-made stuff!) I frosted the cake with a tub of frosting that we added Duncan Hines Flavor Creations to (it give it color & flavor, she chose Pink Lemonade). I frosted the entire cake in it and then rolled out homemade green and blue fondant and decorated the wings and made a matching skirt for the Barbie (Giselle from Barbie in the Pink Shoes).

I have one happy little girl with such a special birthday cake!

Check out all the posts I have done that revolve around fairies!

Friday, April 19, 2013

Re-Purposed Item #4 - Fairy Doors from Recycled Clay


Ok, so maybe it's not so much as a Re-Purposed Item as it is Recycled - recycled clay that is. What exactly is recycled clay? Well, at the Owatonna Art Center they take all the old clay scraps that are leftover or from failed projects and they re-use this clay for their kids classes. My daughter and I recently took a class at the Art Center where we made a fairy house together, each made our own fairy door, and she made a toad house.


 This is the fairy door that my daughter made. She did this pretty much all on her own. She did have a knob on it but it was not attached very well and fell off during drying.


I made this fairy door for my son as I knew he might be a little jealous that she had all these new pottery pieces and he didn't have anything, plus I wanted to made one and my daughter was making her own. I really like how the glaze separated and there is blue shimmery in the veins of the leaf.


Here is a good video about recycling scrap pottery clay.

Friday, April 5, 2013

Pottery Time: Hand Building a Fairy House and Furniture


I have been back in the studio at the art center for both a hand building pottery class with my daughter as well as open studio time to make some new creations. I thought I would share with you some of the things I have been making.

This fairy house was made by hand building. I made it with my daughter during a class we took. She designed the fairy house herself with minimal guidance from me. I actually went in to this class with her thinking we were going to make a very different looking house, but her vision had changed. 

She chose to made a fairy house that looked like a tree stump.


This is the view from the top or the veranda with the furniture she hand built herself. 


Another view of the top without the furniture to see the rings in the stump and you can see how she designed the sides to provide a railiing around the veranda that looks like the bark that was broken off. 


This is just a close up of the furniture she made. She still wants to make some pretend food to go on the table.


These next 5 pictures are all close ups of the sides so that you can see all the details from all sides.

This is the front and we have a vine with flower going up the side. There is a door that is open and a window hole. You can also see she made a snail and mushroom at the bottom of the steps.


On this side you can see a couple more window holes and a small window with panes, as well as a couple more mushrooms.


This is the backside and you can see the large window with panes. You can also see how we carved out detail to make it look more like bark. Many of the window and doorway we glazed with a color (not browns) to add some color for interest.


Another side view with a couple more window holes and a mushroom (different color than the others) and you can see the door is open.


Just another close up of the front and here it is easier to see the glaze painted in the windows and doorway.

This is what the bottom looks like so that you can see how it was constructed and is hollow inside. The base was created by slab rolling out some clay and then draping it over a mold. From there the rest was created by making coils and forming the body of the body of the fairy house. Next the body was stuffed with newspaper and we slab rolled out the top of the fairy house. So, that is the basic construction of this piece.

Friday, March 15, 2013

Even More Pinterest Inspiration

This is my hair in the picture, but I followed the instructions from Oh So Pretty The Diaries. This was a fun up-do idea! I will use this again!

My daughter wanted to see if leaving her tooth in a different location would result in a different present from the Tooth Fairy (read all about that in my Tooth Fairy Post & her recent social experiments). The idea for this one came from Filth Wizardy.


I thought this was a neat picture, so I had to try it for myself.

 My daughter asked for some special valentine hair, so I replicated this idea from PrincessHairstyles.com

And get a load of these delicious treats I made for Valentine's Day. The recipe for the Whoopie Pies came from What's Cooking with Ruthie, but I used Red Velvet cake mix instead. And the raspberry chocolates idea came from Lauren Conrad, but as you can see I used white chocolate chips instead of semi-sweet.


Love these Shamrock Hairclips that were inspired from Potlucks on the Porch (and the one without rhinestones is a pin - my son had to have one too!)

Thursday, December 27, 2012

The Tooth Fairy Makes a Visit Again!

The tooth fairy has made another visit to our house. This time it was a brunette tooth fairy. The above picture was made at iCaughtTheToothFairy.com (which I previously did a post for, but this is NOT a review post.)

My daughter came to the understanding that there are many tooth fairies and they come in different colors. This was the fourth tooth she lost and the previous 4 she put the tooth in a glass of water so that the tooth fairy had to go in the water to get the tooth & the water would turn whatever color the fairy was. The water colors were purple with glitter, green, and red (in that order.) You can read about our First Tooth Fair Visit in this post.

After reading the Tooth Fairy Book that I reviewed, this time she wanted to put her tooth in the gold pouch and see if she put the tooth in a different container if she would get something different. This girl sure likes to perform her experiments; you should have seen the experiments she was coming up with with our Elf (named Skoob) as she was trying to make sense of why it didn't move one night (DOH!)


I have to say again, I really do like this book set. It is very applicable to most homes & whatever they believe about the tooth fairy. This is what I said about it before:

As for the story of the tooth fairy, I was impressed with how they covered all senarios of the tooth fairy that I heard but in a non-committal type of way that allows for parents to blend it with their own story and choose what the tooth fairy brings (money, treat, toy, etc.) I thought it was written in a way that would be appealing to everyone who tells the story of the tooth fairy and has the tooth fairy visit their home.


This time the tooth fairy did change it up and instead of bringing a gold coin with a pack of sugar free gum, she brought a basket made up from a dollar bill with 2 pennies inside & some glitter, as well as a little note  and a pack of sugar-free gum. It must have been the same tooth fairy that went to Filth Wizardy. :)

My daughter was very excited to see that I got another picture of a tooth fairy. When I showed her the picture and told her that I almost woke her up with the flash trying to get the picture of the tooth fairy she remembered there being a bright light that bothered her.

Thursday, November 15, 2012

Review: The Tale of the Tooth Fairy Storybook Set


Have I mentioned we are huge fairy fans in our house? Not to mention that my daughter has lost 2 teeth already and has 4 more wiggly ones that she is anxious to have come out so that the tooth fairy can visit her again. Being asked to review The Tale of the Tooth Fairy Storybook Set was perfect for us. 

When it arrived in the mail, my daughter was so excited to see they sent us the girl fairy (there is also a boy fairy!) and could wait for me to open it so she could read the story and start playing with it. Even as I type up this post, I have to admit that I don't know where the set has gone too. As soon as she was allowed to take it out of my possession she ran off to play with it in one of "secret" play places. They really are not very secret but she has created spaces using an indoor play tent and another area where chairs and a tv tray are obstructing our view of her while she plays. It's quite endearing.


Product Description
Now for the first time - The Tale of the Tooth Fairy tells the story of how a little fairy finds her true calling in helping children with the very first sign of growing up - the loss of their baby teeth!  Includes hard cover storybook with Tooth Loss Record Keepker, a boy or girl Tooth Fairy plush doll with Tooth Pouch and a Keepsake Box.  Similar in likability to The Elf on the Shelf, the Tale of the Tooth Fairy will be a darling for parents, grandparents and children alike!    The Tale of the Tooth Fairy was written and designed by husband and wife team Mary Kate Fleming and Brian Ledig. 


I have to say that I was quite impressed with this set. All of it is of very good quality and it meant to be loved and played with and withstand a lot of wear. The book is of a thick hard book style and has beautiful glossy pages that just feel good when you turn the pages (yes, I know that may sound weird but I like reading actual books and how the pages feel in my fingertips.) The colors are vibrant and images are cartoon-like that kids will enjoy. At the end of the book there is also a diagram of a mouth full of teeth and spaces for you to write in when each tooth was lost. It is a very neat way of this type of record keeping on your child.

As for the story of the tooth fairy, I was impressed with how they covered all senarios of the tooth fairy that I heard but in a non-committal type of way that allows for parents to blend it with their own story and choose what the tooth fairy brings (money, treat, toy, etc.) I thought it was written ina  way that would be appealing to everyone who tells the story of the tooth fairy and has the tooth fairy visit their home.

And my daughter just loves the box it came in, which is also a house for the tooth fairy. The box looks like a book on the outside with an image of a fairy house but once you open it up there is images that look like the inside of a fairy house.

Finally, there is a stuffed tooth fairy that they child can play with but also goes along with the story. The tooth fairy doll carries a golden bag which the book encourages the child to put their tooth in there and leave the doll with bag out so the tooth fairy can obtain the tooth from there instead of trying to find it in the dark under a pillow.

Check out  The Tale of the Tooth Fairy and let me know what you think!

You can buy The Tale of the Tooth Fairy - Girl on Amazon or from their website.


I received one or more of the products mentioned above for free using Tomoson.com. Regardless, I only recommend products or services I use personally and believe will be good for my readers.

Friday, October 19, 2012

Fairy Fun


We are big time fairy fans in our house. My daughter loves all the fairy books in the multiple series by Daisy Meadows and the love is always heightened after we visit the Renaissance Festival.

If you remember some of our previous fairy posts, we have done a multitude of fairy type crafts:
And Don't Forget....

My Lil Fairy in front of the fairy house she liked best  in the competition.
My daughter being sprinkled with dream fairy dust to give her  good dreams.
My daughter on her first day of first grade in front of the fairy house we built the day before.
A new fairy I made for her fairy house. She didn't have a pink one & now has requested a gold one. Fairies in the book series she likes to read, all comes in multiples of 7. So I might have to make a line of Sparkle Fairies.


This is one I did by needled felting. Do you want to learn to needle felt, then check out my recent post on Northern Cheapskate titled "Learn to Needle Felt Some Easy Crafts"


AND YOU CAN STILL GET YOUR OWN FREE TOOTH FAIRY PICTURE!!!!

Wednesday, September 19, 2012

Tuesday, September 21, 2010

#164 Make Fairy Wands

These were fun to make. We first collected 4 sticks (one for each in our family) of wand quality from the backyard. They we made a collection of leaves from different sources (maple tree, lilac bush & bean plants). We tied the stems of the leaves to the stick with some twine. Then we decorated the wands using markers. And finally sprinkled the wands with magic dust & sprinkles (see post #163.)

#163 Make Fairy Potions

My daughter is REALLY into fairies these days, so we will probably have a series on crafts & activities to do with fairies. This one is making magic fairy potions. Really the magic involved in this is her imagination.

One night I told her this would be the activity we would be doing the next day and she was to create recipes that night. So, she diligently got to work. Got out her notebook & markers and began drawing pictures of things we could find in the yard to add to each of the jars.

Then we used 4 jars I had been saving (to use for whatever) and filled them with water & a drop of food coloring, mixed in up with a stick and added items according to her recipe. She ran around the backyard collecting items and putting them in the jars just as she had drawn them.

The magic part comes in with sprinkles & dust. I told her I had magic sprinkles (raw sugar) and magic dust (wheat germ). She asked what the difference was and I told her, "They do pretty much the same thing - make things magical - it's just that some fairies like to use dust and other fairies like to use sprinkles." So, she made her choice with each recipe if it needed sprinkles or dust.

Oh! And she decided what each potion did. So, now we have potions that: make big bubbles, make big carrots, make fairies life-size, and make the leaves fall from the trees.