Showing posts with label crafts. Show all posts

Friday, November 9, 2018

Free Holiday Events at Cabela's


It all starts this weekend! So, check it out! We are lucky to have one very near us and since I still have one left who is a believer we will be participating in some of these as our schedule allows. The age of my son now is the age my daughter was when she stopped believing, but I got through Christmas and Easter that year. This may very well be the last year. I am not sure how things change for us, but I want to take in all the "magic" I can this year.


Wednesday, May 31, 2017

Where Did We Go Wednesday? Crayola Experience


I had the opportunity to go along with my son on his field trip to the Crayola Experience at the Mall of America last week. Crayola Experience only gives so many chaperone passes and I was not picked to be one of those but they allowed additional chaperones to come along for $9 a piece which is a bargain when you consider that the cost of admission is $19.99 a person. My sons admission was covered by the school so I didn't have to pay for that so for two of us to go for that price to check it out is a good deal. I really wanted to see what it was like because my kids have been asking to go but considering that it would cost $60 for me to take both of them I wanted to be sure it was worth the cost because $60 sure can buy a lot of crayons. Just to note you can buy a season pass which is unlimited admission for $29.99 per person or $99.99 per family. The next time we go, and there will be a next time we will be buying a season pass. Unlike other season passes we get this is a for-profit company so our season pass is not tax-deductible.


We were there for 3 hours on the field trip and managed to get around to all but one area. Some of the areas we had to rush through because we wanted to try to get as many as possible. I am not sure I could even pick out what my favorite area was. There is a lot to do here. You end up leaving with many projects but there are still even more areas that are just physical play or they are a digital type of area.

In the picture above you can see the crayon ring I made. That is in one of the areas and you get to choose between three different wax Creations, one of which is a ring. In that same picture you can see my son is watching his crayon drip and melt into his creation.


This next picture is a good example of some of the large motor skill play areas as well as digital areas. Same with the bottom picture which is two pictures of my son and I in a digital area where it appears like crayon wax is dripping over us. 

There is a couple of shows to watch while you are there. They are live shows. One of them shows how a crayon is made from start to finish and at the end they give them a red crayon which is what they are demonstrating being made. The other show was demonstrating the scientific properties of silly putty. Both shows are performed at various times throughout the day. So you are sure to be able to find one of them that fits into your schedule.

Besides getting a red crayon from the one show there is also another area where you get to name your own crayon can you pick out what color you want and put whatever name on it you want. So between the crayon mold, the show and the name your own crayon area you will leave with three crayons.

There is also a puzzle making station and a painting station and a hot wax Spin Art station and a hot wax painting station. You will leave with projects from all of those if you do them. There is also a station for Model Magic clay that you can do. This station as well as the crayon naming station take one token each period we were given a token for each one for each person when we arrived. They do have a station where you can buy more tokens that is by the Model Magic dispenser. The Model Magic dispenser gives you one color of Model Magic clay / token. Tokens were two for a dollar.

There is also two big play areas with slides and tunnels and monkey bars that kids can play in one is geared towards younger kids and one is towards older kids. There is also area where there is a huge Lite-Brite to play with. The number of digital areas is probably about a half-dozen of them. I didn't do those as much because there is only so many stations and we had so many kids that were wanting to play that the adults just watched in these areas

There is a Café there and they do serve a variety of food but we had brought bunches. I'm not sure if they allow you to normally carry in food or if they only allow this for school groups.

I am sure I am missing telling you about some area or private we got to create but as you can see there is quite a bit to do to fill your time.

Friday, October 28, 2016

Halloween Popsicle Stick Hanging


These were so fun to make with my kids and their friends. We started out with gluing all of the popsicle sticks on to 2 sticks (on the back side to brace it). Then we painted how we wanted them to look, and fro what you can see one person wanted to just paint a pumpkin in a frame instead of having the whole hanging be a pumpkin, which I thought was an interesting idea.

I put out a variety of colors of felt and other crafts supplies for them to choose from and cut out what they wanted and hot glue in to place. We use jute twine that we hot glue in place to hang it with.

Tuesday, March 22, 2016

More Kid Projects Compliments of Pinterest

I thought this idea for laminated play dough mats was genius! I got the idea from Planet of the Apels. I printed them all off and used clear contact paper to laminate them (I did go through most of a rolls to do this) but now we can use them over & over again and get them out to play with when friends come over. We can also use them as dry erase mats. This is great for doing preschool at home.

This project was my "birthday cake" compliments of my 7 year old daughter. Of course, I scoured pinterest first for a recipe that require NO BAKING (ok, I did bake a store bought whole wheat crust, but you can use a pre-made graham cracker crust for this.) But she did mix all of the other ingredients and pour them in to the cooled pie shell. The recipe comes from the Eagle Brand website. There is only 6 total ingredients and that includes the pre-made pie crust. So, if my 7 year old (now 9 years old) can make this, anyone can. No excuse that you can't make a pie.


My son and I made this zip line lego guy after reading about it on Little Bins for Little Hands.There are a lot of different ideas on here for creative lego creations. We will certainly be trying out more of them.


This is a Minecraft sword that my daughter made for her brother as his homemade Christmas present this past Christmas. This is a printable available from All For The Boys that you can glue on to foam board or cardboard.

Thursday, April 9, 2015

DIY Wood Buttons


As you have seen on a variety of posts on here, I am a loom knitter. I like to make a variety of yarn crafts including scarves and hats. Often times I like my own to be adorned with some kind of flower or buttons and have made pottery buttons to use, but I have also made my own wood slice buttons.

A couple of them in the picture I drilled a hole at the top so that I can use to make a pendant in my jewelry making, I don't have a plan quite yet for them but thought since I was drilling all my holes I would go ahead and create a couple and hope I become inspired, maybe I will try a little wood burning on them later on, but for not we have plain wood slice buttons and I can't wait to make a hat and put a collection of 3 or so together on them.

Buttons can be expensive and if you don't have any you can re-use that came extra with articles or clothing, than why not make your own!

Tuesday, March 17, 2015

Happy St. Patrick's Day!!!! Check out these fun ideas!


This is how we celebrated St. Patrick's Day in our household this year.

1) I sent my daughter to school with Shamrocks hair chalked on her head.

2) I made green pancakes (just add food coloring) in the shape of shamrocks and served green milk. I topped the pancakes with some whipped cream and green sprinkles.

3) My son did a Puffy Paint 4-Leaf Clover painting.

4) I made Leprechaun Treats! They are magically delicious!

Tuesday, August 12, 2014

Try It Tuesday: How to Make Slime


How to Make Slime

1 C White Glue
1/2 Water
1 C Water
1 tsp. Borax
1-2 tsp. washable paint (optional)

Ingredients:

  • Mix together the white glue and 1/2 of water and paint (if desired)
  • In another bowl, mix together 1 C water and borax
  • Pour borax mixture in to glue mixture and stir together.
  • Now you have slime!
  • HAVE FUN!


Tuesday, February 4, 2014

Try It Tuesday: 10 FUN and EASY Valentine Crafts for Kids


1) This is a classic Valentine craft for preschoolers where you take a toilet paper tube bend it so that it is pointed at the bottom and goes in the center at the top and then let them dip in paint and make prints on a piece of paper. We chose light pink paint on red paper.
2) This was so much fun. My daughter decided to paint her hands in glue and then sprinkle with glitter, whereas my son used paint to make his hand prints.


3) This is another easy one. All you need is a coffee filter, some children's markers and a spray bottle of water. Just cut out a heart from a round coffee filter. Then have the child color as much or as little as they want. They can scribble all they want. The more color you get on there, the better it will spread. When finished, just spray down with water (I did it on top of a plastic placemat, so the colors would not get on other things) and let it dry.

 4) The raspberries stuffed with white chocolate chips are a fun and easy snack for kids to make.

5) Try out these Red Velvet Whoopie Pies from What's Cooking with Ruthie.
 6) Use a paper doiley and paint over it on a piece of construction paper and remove to see the design it has left. Simple & fun!


7) Take care of 2 February Holidays in one craft and make a Heart Groundhog out of 1 large heart (head) and 2 small hearts (nose and mouth), a couple of ears, some googly eyes and some drawn on whiskers.


8) A Valentine Candle Holder can be a quick and easy present to have a child make a parent. Simply decoupage strips of tissue paper on to a baby food jar (great re-use idea!) and be sure to add a final layer of glue on top. Tie it with a ribbon or some yarn and insert a candle. We still have ours and get it out to reuse every year.
 9) Give your child a special and fun message by making them a Puzzle Valentine. I just glued some paper heart doilies on to construction paper and wrote a message on it. Then cut out your pieces and laminate it by putting it between sheets of clear contact paper.
10) My final idea is one of my more popular pinned posts is this Egg Carton Valentine made by reusing egg cartons as art supplies. Paint the bottom of an egg carton then trim after it has dried. Simply glue down trimmed egg carton pieces and glue on to construction paper in the shape of a heart. Paint over the top of all the egg carton pieces and the white spaces in between to have a filled in heart.


What kind of fun Valentine Art Projects will you do with your kids?

Thursday, October 31, 2013

Happy Halloween! May It Be Filled with Snacks and Crafts!

I Hope You Have a Happy Halloween! 
We have been enjoying it all month!
Check out what we have been up to!


Painting to remember the size of those fingers, hands, toes and feet!
Inspired from something from Fun Handprint Art, but we changed it up to make it our own.


Paper Mache Monster or Alien Masks


Friday, June 14, 2013

Pottery Time: Pendant Neckalces


Both of these necklaces are heading to Pennsylvania. I made them for 2 different dear friends that are/will be living there. Once friend was in MN for a visit for her college reunion and I gave her one of the necklaces as well as a pottery bowl (that will be in a later post). Another friend is moving to PA at the end of the month and I gave her the other necklace and a pottery coffee mug (yes, that too will be in a later post because there are 2 other mugs I made to gift included in that post that will not be given until later this month and next month).

To make these I slab rolled out the clay and then made the imprinted design with a textured wooden roller. They I cut out the shapes by free hand and poked holes in the top. For the jewelry making part of it, I bought a chain that was beaded (I call this a cheater chain, but I had a 1-day turnaround on one of the necklaces from when it came out of the kiln to when I was gifting it) and used some jump rings, a ball clasp and a toggle & hoop and made the necklace.

If you like these necklaces, you might also like the pottery pendant earrings I made too.

Check out all my pottery creations!

Tuesday, March 12, 2013

Try It Tuesday: Paper Plate Leprechaun


I have another fun paper plate craft to share with you just in time for St. Patrick's Day. 

Supplies needed: paper plate, washable paint (I used orange, yellow & white to make a flesh color), paint brush, googly eyes, yarn, dot markers (optional) and construction paper.

Directions: Paint entire paper plate on the convex side of the plate and allow to dry. Glue pieces of yarn on top of the head. Glue on a hat & bow tie (I cut them out for my preschooler) and googly eyes. Use a dot marker to make the nose and mouth.

Check out my Other Paper Plate Crafts:
Coming Soon! Pirate!


Friday, March 8, 2013

Kids Crafts Inspired from Pinterest

I love this idea for the Hidden Pictures Lunchbox note. It is fun to mix up the lunch box notes, so I printed these off and use them from time to time. Other times I just right a note of affirmation, other times I write a joke and sometimes I forget to put anything at all in there. LOL!


My son did this one. You too can obtain the printable page from Inviting Printables.


We made this Ivory "Snow" as part of our snow theme for preschool at home. I got the idea from Homemade Serenity.


These Ice "Marbles" were a fun project. The idea came from The Queen Says. My daughter thought it was fun to pick out a variety of sizes & colors to make.

 
As were these Ice Lanterns from Craftiments.......I let my daughter mix up colors and create her own colors using liquid food coloring.

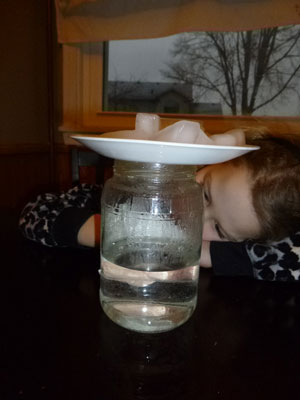
And we can't forget the Weather in a Jar experiment that I read about on I Can Teach My Child.


And certainly we can't forget the Jellyfish in a Bottle Project! Such a creative idea from bhoomplay's blog.

So many great ideas on Pinterest!

Be sure to follow me there!