Looking for ideas to save some money while saving a little bit of the Earth for future generations? Then let this crafty mom of two help you become a little bit greener!
Showing posts with label jewelry. Show all posts
Monday, June 12, 2017
Collect Shells on the Beach for Free Pendants
Are you taking a summer trip that will bring you to the beach? Consider looking for some shells on the beach that have a hole on the top. You can easily turn these in to pendants (or earrings if you find similar sized ones). What a wonderful momento of your trip and the shells were free to pick up. Be sure to clean and sanitize your shells before using them. Or you can use them to make some thrifty gifts for others.
Tuesday, November 15, 2016
Boot Print Pottery Pendant
This is a super easy craft you can have a child do. You can even use Air Dry Clay and paint clear nail polish on it.
To make this pendant, form your clay in to a ball shape. Then have the child step on it gently until it flattened, but they have not touched the ground. Use a straw to poke a hole at the top and rmove the clay from the hole.
Allow to dry and then either paint or glaze however the clay you are using dictates.
Have fun!
Friday, January 15, 2016
Pottery Pendant Necklaces
I made these pottery pendant necklaces for myself, 3 girlfriends and my daughter. I started making a piece of jewelry for our annual girls weekend over 4 years ago. I just booked our weekend for this spring yesterday and we are all very excited. So, these are the necklaces I presented them last spring that I am finally getting around to share with my readers. My daughter doesn't come on these weekends, but when she saw the design I had drawn out she asked if I would make her one too.
To make them I simply made a coil that I shaped in to an oval and blended the ends together. Then I made a small clay ball, and for lack of a better term, I smushed it down to flatten it slightly and then scored the bottom and added some slip and smoothed the backside to ensure it stayed joined.
As far as glazing goes, I tend to make us items that all are similar, but personalize it in some way. This time I did glazes in the center ball that most closely resembled birthstone colors.
I strung them together with a faux leather cording and wooden beads. I chose this look because we were on an outdoorsy/active weekend to Eagle Bluff in Lanesboro, MN for that year.
Apparently I never pinned my first set, which was coordinating beaded earrings using all 4 of our birthstone colors. The next year I made these Pottery Pendant Earrings. The 3rd year I made Hemp and Pearl Bracelets like in the link (apparently I didn't take a picture & make a post of this one either.) And this necklace was our fourth year.
Now, we are on our 5th annual girls weekend and I need to start thinking about what I am going to make us. I have done 2 sets of earrings, a bracelet, a necklace. What should be next? Hmmmmm....
Anyways, check out and follow my Handmade Jewelry Board on pinterest. See some of the things I am inspired to make and other jewelry I have made.
Tuesday, April 7, 2015
Pottery, Ribbon & Bead Necklace
This turned out even more beautiful in person. It is hard to catch the shine from the beads and the ribbon. I made this for a friend, but now I want to make one for myself.
The "chain" piece is made by sewing beads on a clear jewelry cording back and forth on ribbon. The pendant is a pottery piece that I made by hand building and pressing in a texture and glazing.
Wednesday, February 4, 2015
Wordless Wednesday: Recent DIY Jewelry Creations
Below you can see the larger picture of some of the jewelry creations that were made my myself or my kids that we gave as gifts this past holiday season.
These are a combination of one made by my daughter & myself.
I made these ones
This is a pendant my son made on a crocheted ribbon chain.
And I made this one too.
Tuesday, January 13, 2015
Homemade Christmas Gifts
This holiday season our family has received so many awesome homemade gifts from friends and family and I wanted to share with you the hard work others have done. Maybe these ideas will help give you some ideas of your own for gifts that you want to make in the future.
This is my son with his Stegasaurus backpack and hat that my parents gave him.
This is my wooden door mat that my parents made for me.
This is my daughter with the quiver my parents made for her. Her arrows are all at home and weren't available for this picture, but she is anxious to use this with them when she goes to Archery practice.
Some yummy ice cream toppings that my parents made (well, probably just my mom.)
This is some homemade lavender-mint fabric softener that a friend made. I have already been using it so the cute tied on label is gone, plus 1/4 of the fabric softener is gone.
My MIL made me this present, which will go to the cabin with us. It is a table runner (folded in half in this picture), a button on towel, napkins, and potholders.
My parents made this wooden slide-in sofa side table for my husband. He actually has one they made him a couple years ago but we use it so often (usually the kids have confiscated it) that he really wanted to have a second one.
My MIL made this beautiful dress for my daughter and a matching one for her American Girl doll.
My daughter made me this bracelet.
My son made these bird feeders for his grandparents.
What is missing from these pictures of homemade gifts we received are:
* Winter Survival Kit (we have already taken this apart to use, it had in it Kleenex, Airborne, Ricola cough drops, lip balm, hot cocoa, and tea) - from my parents
* Homemade Candies - caramels and peanut clusters made and given by a friend in book club
* Homemade Playdough with a cookie cutter- for my son from his preschool teacher
* Handpainted Snowman Jar filled with a tealight and candies made by my son while at preschool
* Elf/SantaCandy Jars filled with Hersey kisses and a little felt hat on top and black belt for the kids from my parents
* Hand painted picture of our cabin from one of my friends (this is still in process, I was just given a picture of the work in progress so I haven't actually received it)
Plus, I wouldn't want to forget about the gifts of time a couple of friends have given me. One friend treated me to a pedicure at a local spa and another friend took to to a dinner at a winery with thieving from the barrel.
Gosh, I hope I didn't forget any homemade gifts. They are all wonderful and I really appreciate the time people have spent making those gifts and thinking of us.
We also received lots of other wonderful gifts that we are extremely thankful to have received and feel very blessed to be gifted with. We are very fortunate.
Labels:
12 gifts of Christmas,
american girl,
dinosaur,
food,
gifts,
jewelry,
kitchen,
laundry,
living room,
outdoors,
sewing,
wood
Monday, November 10, 2014
Review: Bold Orange Triangle Tagua Beaded Bracelet
My Thoughts
I am in love with this Bold Orange Triangle Tagua Beaded Bracelet from Artisans in the Andes. Over the last couple years, I have slowly been trying to add more color in to my wardrobe. Somehow most of my wardrobe because mostly composed of blacks and tans. So, as I get new items for my wardrobe I have been trying to add a bit of color to help show my personality while still incorporating browns and blacks (mostly in my pants). Jewelry is a good way to add a pop of color and can instantly dress up any outfit, which is why I just love this orange beaded bracelet. This exact beaded bracelet is not currently on the Artisans in the Andes website, but they have a very similar one in the color fuchia or vivid green, plus several bracelets of the 30 listed for sale that have orange in them, if you are looking for an orange bracelet.
What I also love is that this website is a family run business that believes in fair trade and helping the local artisans in Ecuado, who have created these beautiful pieces of jewelry like this beaded bracelet, a fair living wage for their work. Also, many of the pieces are created with eco-friendly sustainable material, like the tagua that this bracelet is made of. Tagua is called a "vegetable ivory" because it comes from the nut of a rainforest palm tree and hardens and has the color of real ivory inside the nut. Making beads tagua that look and feel like real ivory has a tremedous environmental impact because it saves elephants from being pached for their tusks and also cuts down on the use of plastic.
Consider purchasing a gift of fair trade jewelry this holiday season from the
Product Description from Artisans in the Andes:
Chunky and bold, this bracelet is a warm natural orange with small black streaks that add an organic vibe. The vibrant color of this bracelet will make you feel passionate and stimulated, ready for the next challenge. The unusual soft triangular shapes of the beads fit together in a winding pattern around your wrist, symbolizing union and balance.
The bracelet is made with carved and dyed tagua nuts, sometimes called vegetable ivory. Tagua is harvested from palm trees in the Amazon Rainforest, providing a valuable and sustainable source of income to the indigenous harvesters. Tagua is dried in the sun for several months where is becomes very strong, with a character similar to elephant ivory. The bracelet is 7 inches (18 cm) around and is made with strong jewelry elastic so that it will fit any size of wrist. The triangles are 1.5 inches (3 cm) across. The points of the triangles have been filed round to provide a very comfortable fit.
Why buy fair trade? The Artisans that we work with at ArtisansintheAndes.com have a limited amount of marketing skills and face many barriers to accessing international trade. They are skilled in making beautiful and unique accessories and we find them to be very committed to quality. We are committed to help them find a market and promote their products. The fair trade goods we stock at ArtisansintheAndes.com are made by artisans from Ecuador, a developing country. Fair trade helps create better lives and the opportunity for the artisans to develop sustainability within their communities.
I received one or more of the products mentioned above for free using Tomoson.com. Regardless, I only recommend products or services I use personally and believe will be good for my readers.
Tuesday, September 9, 2014
Try It Tuesday: Latest Jewelry Creations
These are some earrings that are Mother of Pearl and Pearl that I made for a friend for her 40th birthday. I really think they turned out beautifully!
This is a necklace and earrings set I made for myself. My ILs had given me a necklace for Christmas that I really liked, but it wasn't nickel free and I have a nickel allergy, so they returned it and gave me money to go buy something. I really did like the necklace and wanted something with a silver tone, so I used the money to buy jewelry making supplies to make my own that I would not be allergic too.
Here is a close up of the earrings.
These next two pictures are of a stamped initial I made for a friend for her birthday. I had made her some other pearl earrings for her birthday, so I wanted to make something to coordinate with them, as well as with the ribbon and pearl bracelet I made her for her birthday.
This is just me showing you want it looks like when it is worn.
Tuesday, August 26, 2014
Try It Tuesday: Custom Charm Bracelets
This was a mother-daughter project. I thought it would be fun to make charm bracelets together this summer. We often make earrings, but I had not let her make a bracelet yet with my beads (of course she has made plenty of bracelets with kiddie supplies.) The larger bracelet with pink hues in the beads is my bracelet and the smaller bracelet with more blue beads is my daughter's.
To start out with, I bought already made bracelets from JoAnn fabrics. Her child-size bracelet was actually only $1. Mine is silver plated in hopes that the silver plate with hold up and protect me from my nickel allergy.
Here are the instructions as they are detailed on the back of my bracelet. You do need to have a fine round nose pliers to curve your head pins (you will need to buy head pins and beads as well.) A set of the 3 typical jewelry making pliers is relatively inexpensive. I bought mine for about $10 for the set of 3.
Here is a close-up of me wearing my bracelet.
Here is a close up my my daughter wearing her charm bracelet.
Tuesday, June 17, 2014
Try It Tuesday: Pearl and Ribbon Bracelet
This is a bracelet that I just made a friend this weekend. I am giving it to her today as well, so you may be seeing this post before she gets the present from me. I made it to go with these Elegant Snowman Earrings (the solid white ones) that I made. She had mentioned she was thinking of wearing the earrings with a navy dress, which is why I chose the navy ribbon.
At the back you can see the toggle clasp that I used on the bracelet.
So, the instructions are easy, but making it is a little putzy if you are doing the double ribbon like I did. If you just do a single ribbon it will be much easier and quicker, but if you do the double like I did you want to keep the thin ribbon in the center of the thicker ribbon.
I threaded my wire on a needle so that I could "sew" through the pearls and ribbons. I started by first putting it through the ribbon then through the pearl. Then wrap your ribbon half way around and thread your wire through it then through a new pearl and again half way that pearl on the opposite side so that you are weaving the ribbon between the pearls.
Keep adding pearls and looping the ribbon over half until you have created your desired length. Then attach your clasp; I used a toggle clasp. The picture below shows you what it looks like before attaching your clasp.
Tuesday, May 13, 2014
Try It Tuesday: Washer Necklace
This was a fun and easy gift that my 4 year old son made for his sister and his Godmother. We just went to hardware store and picked out some large washer since we could but single ones and bought some cording from a craft store. The paint is simply fingernail polish.
He did all the work himself. It was a simple project but did have may steps that took time. He had to paint 2 coats of fingernail polish on each side. So, he painted one coat and then we played a game while it dried, then he painted the second coat, which we let dry overnight. The next day he repeated those steps. We allowed another day because he wanted to add spots to one of them.
Then I told him how to loop the washer through the cording to hold it in place and then tie the ends together. He was very proud that he could make this gift all on his own just by following my verbal intructions.
Thursday, May 8, 2014
Thrifty Thursday: Shells Made In To Earrings
This is a pair of earrings that my daughter made for her primary 2nd Grade Teacher for Teacher Appreciation week. When we were on vacation in Florida, we kept our eyes peeled as we explored the beaches for shells and other items that we could make in to jewelry for ourselves (thrifty idea for a souvenir!!). While we were at Cocoa Beach we saw that most of the little shells had holes in the top, which made them perfect to make jewelry with. We picked a bunch and tried to find ones that were close to matching. We already had it in our mind while we were collecting that she was going to design a pair for her teacher for this week. My daughter gave her earrings as a Christmas gift as well and the teacher loved them.
It was my idea to make a little tag that says "Is It Shellfish that I want you to be my teacher forever?" I thought I was clever. :)
Sunday, December 22, 2013
More Earring Gifts (my daughter's designs!!!)
My 7-year old daughter designed all of these earrings, the top two are for teachers and the bottom one is for a babysitter. They will all have been gifted at the time of this post. I let her have the pick of all my beads and sat with her while she designed them and was so impressed with how perceptive she was to her teachers taste. She really likes designed jewelry and here are 1 other posts if you want to check them out: Post 1 and Post 2.
Saturday, December 14, 2013
12 Gifts of Christmas: Elegant Snowman Earrings
I didn't want something over the top and blantently snowman or anything that was a holiday cliche. I was going for elegant and something that could be worn year round with the subtle reminder of a snowman. I decided on two different styles, one using all white glass pearl beads and the other using a combination of white, pink and a grey-white glass pearl bead. You may remember the grey-white pearl beads from the drop earrings that I made myself.
Tuesday, November 19, 2013
Try It Tuesday: Handmade Vintage Look Earrings of the 60s and 70s
Ok, I can finally share these with you. I had made them a little while ago. I just went to the Little Black Dress Affair and the theme this year was vintage. (LBD is a yearly fundraiser for women to attend that includes dinner, fashion show, silent auction and more for local charities. The charity benefiting from it changes from year to year. This was my second year attending.)
Anyways, I found my little black dress I wanted to wear for this event and it is 60's in style and started to explore how to accessorize for the 60's. I like dressing up for fancy events like this, especially if there is a theme (I'm also fond of costumed events too.) One of my friends who recently had a birthday had told me that the dress she purchased was 70's in style so I thought this would be a very cool present to make her for her birthday would be earrings to go with her dress.
Friday, June 14, 2013
Pottery Time: Pendant Neckalces
Both of these necklaces are heading to Pennsylvania. I made them for 2 different dear friends that are/will be living there. Once friend was in MN for a visit for her college reunion and I gave her one of the necklaces as well as a pottery bowl (that will be in a later post). Another friend is moving to PA at the end of the month and I gave her the other necklace and a pottery coffee mug (yes, that too will be in a later post because there are 2 other mugs I made to gift included in that post that will not be given until later this month and next month).
To make these I slab rolled out the clay and then made the imprinted design with a textured wooden roller. They I cut out the shapes by free hand and poked holes in the top. For the jewelry making part of it, I bought a chain that was beaded (I call this a cheater chain, but I had a 1-day turnaround on one of the necklaces from when it came out of the kiln to when I was gifting it) and used some jump rings, a ball clasp and a toggle & hoop and made the necklace.
If you like these necklaces, you might also like the pottery pendant earrings I made too.
Check out all my pottery creations!
Monday, June 10, 2013
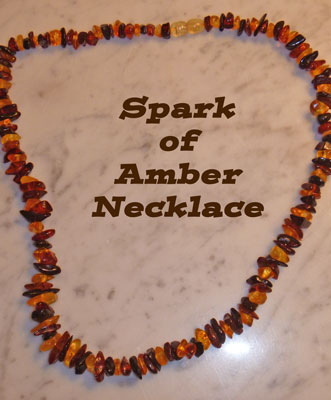
GIVEAWAY and Review: Spark of Amber Necklace
I love this necklace from Spark of Amber!! I love the colors of it and that it goes with everything from a t-shirt to a sequined dress top. I have worn it already over a half dozen times since receiving it and it has been a perfect accessory. I love that there is no metal used in it at any point, which is REALLY important for someone who has a nickel allergy and easily will begin get a rash or blister when they have direct skin contact. It is the perfect length for scoop neck tops! To buy your own necklace like the one I received or any other Spark of Amber product, please check out their ETSY shop. Shipping is FREE on all items and it ships from the USA.
Now that I have told you why I love this necklace, I will share with you some other reasons that you too might love this necklace, if not for the same reasons I have. Baltic Amber contains Succinic Acid on the external layer. Succinic Acid is claimed to have healing properties that include natural anti-bacterial, anti-inflammatory, anti-toxic, pain-relieving and calming properties. Europeans have found that it is great for teething babies as it helps relieve teething pain, tame irritability, and relieve inflammation in the ears, throat and stomach. There are specific Teething Necklaces that they sell. I can't testify that any of the above healing properties worked for me, but I think it's a great added bonus to great look it gives me.
You can find out more information or buy Spark of Amber products on their:
ONE LUCKY READER WILL WIN A SPARK OF AMBER NECKLACE!!!
Enter Rafflecopter Form Below
I was given a Spark of Amber necklace for the purpose of review. No monetary compensation was received, All thoughts, opinions and pictures are my own.
Subscribe to:
Posts (Atom)