Tuesday, December 28, 2010
More Gift Ideas to Come Next Week
There are a couple more gifts that I made by re-purposing items and using up stuff I already own, but we still have one more Christmas to go and since those who will be there read this blog, I don't want to spoil the surprise. So, stay tuned!
#177 Create Paint Chip Art
 I wish I could remember where it was that the piece I saw online was that inspired me to create this art piece for my husband for a Christmas present. And since I couldn't remember where I saw it, I had to come up with my own idea of how it should look and how to make it.
 Honestly, I thought this would be a simple piece to create but it turned out to be a thorn in my side.
The supplies I used were:
* 9 pieces of paint chip samples
* 16x20 stretched canvas
* blue painter's tape
* leftover glue
* leftover wood stain
* an old rag
* leftover spray laquer
I bought the canvas from Michael's craft store & used a 20% off coupon. The paint chip samples came from Lowe's and I trimmed them square so that there was no words showing and of course these are free in the paint department.
After trimming up the paint chip samples, I glued them to the canvas. The problem was that the paper samples curled up on the sides.I tried 2 different times of gluing them down and putting objects on top to keep them flat. It did not work. Then I used blue painter's tape across all the edges to keep them down. This worked pretty well, but I did have to apply another bit of glue on the very edge and tape down a second time.
After the squares were glued flat to the canvas, I rubbed leftover wood stain over the entire canvas & squares. Then I rubbed some of the stain off the squares so more colored showed through.
Finally, after the stain was dried, I applied 2 coats of spray lacquer (letting them dry in between).
So, this was my attempt at a Christmas gift for my husband and I think it turned out pretty good. I made it for him to display in his home office. It's hard to come up with ideas to make gifts for guys, but he seemed to appreciate this one, as well as the hat I knit for him with the Knifty Knitter.
The Recycled Sweater Dress (#167)
 Here is a picture of my daughter in the dress I made for by re-purposing a cashmere sweater and wool sweater of mine. You can read more about it on my tip #167.
Monday, December 20, 2010
#176 Re-Purpose Bottles for Snow Painting
 Basically, just clean out some bottles that have a narrow spout through which you would squirt something through. Fill with water and enough food coloring to give yourself a desired color. And if you live a state that gets as much snow as we have been getting this winter (although, it's technically not winter yet), you'll want to find all the outdoor activities you can so it's not the same'ole same'ole.
 You could also do this during warmer months on a white sheet that you hang against an outdoor wall.
#175 Baby Food Jar Santa
 This was a fun craft that we did with another family that came over for a Christmas crafting playdate. It does take a glue gun, so mom's help is needed unless the kids are older.
The first thing we did was have the kids trace a circle around an old plastic lid and then cut it out. Then cut a line straight to the middle of the circle. This will allow you to shape it into a cone and glue it in this shape. Place some glue on the top of the car and place the cone on top.
Next you will want to pull apart some cotton balls and then blue them on the top & brim of the hat and also on the jar as a beard. Then I had my daughter picked out some eyes & a pom pom nose for me to glue on and finally, I used a permanent marker to draw on some rosy cheeks.
I think this turned out very cute!
#174 Rainbow Sprinkles in a Re-Purposed Jar
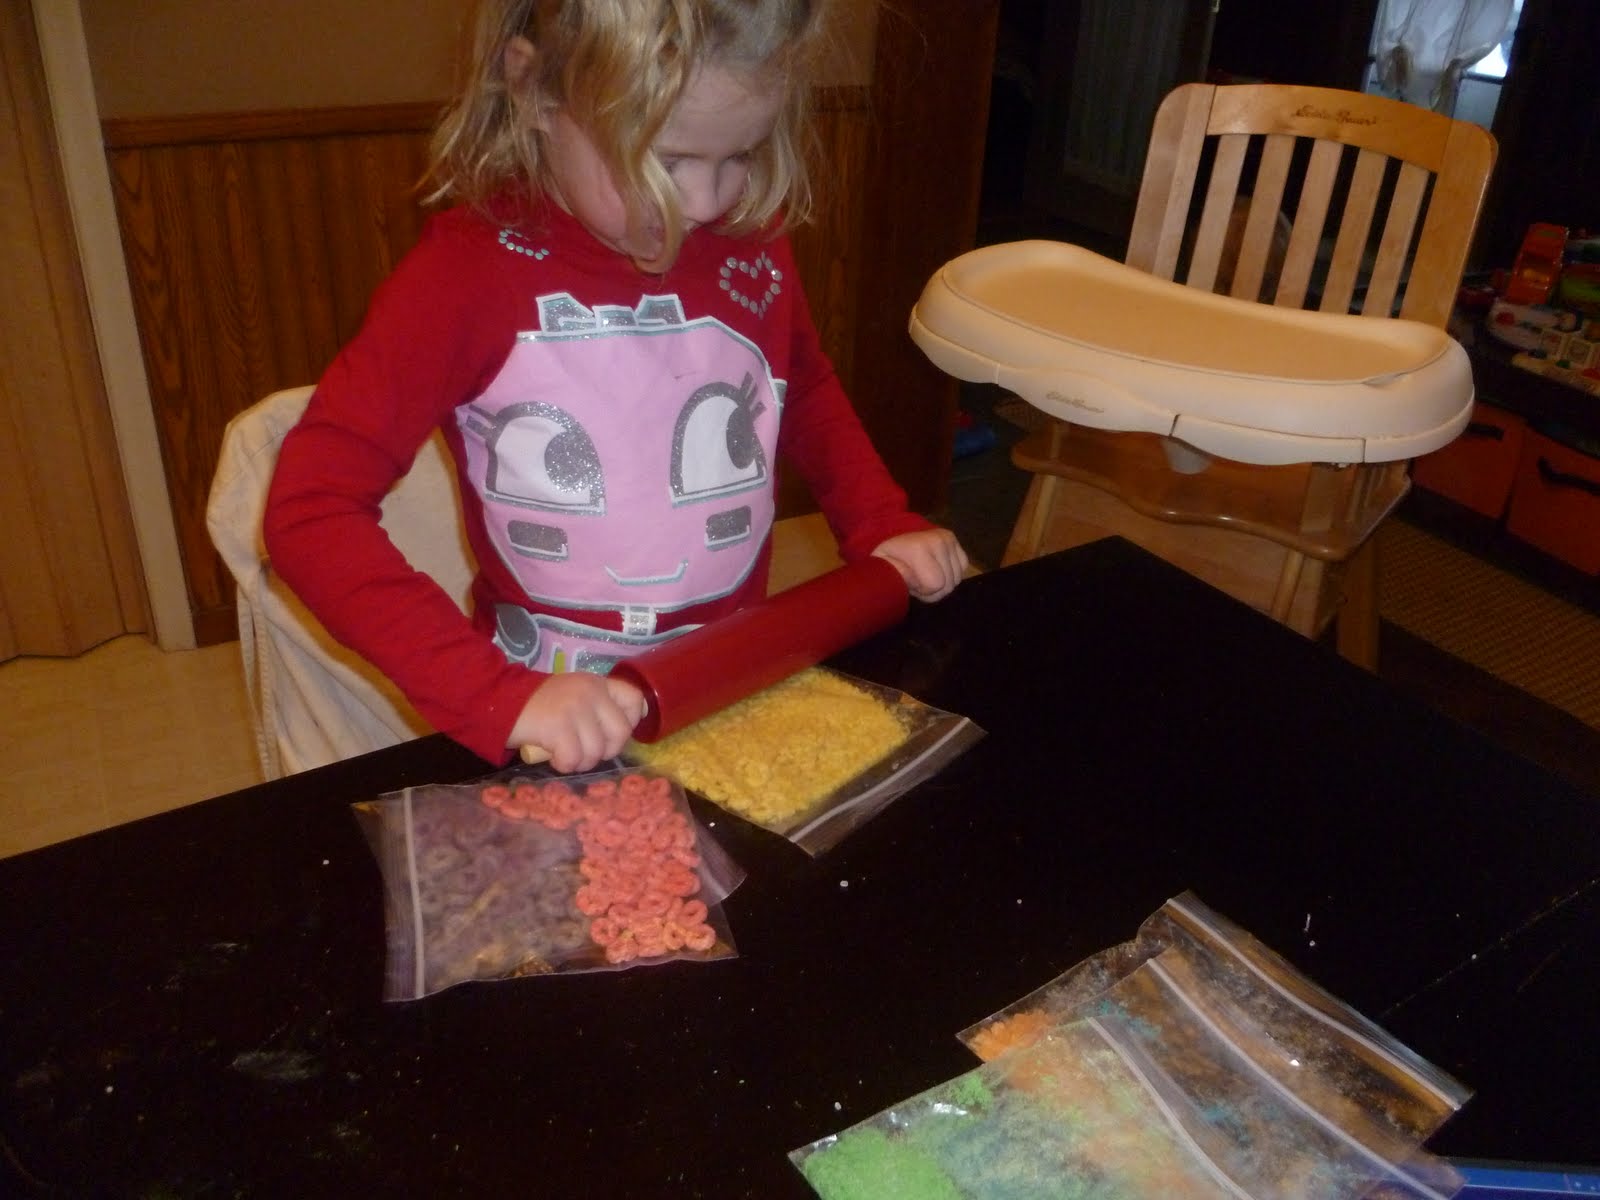 The original idea for this was not mine, I believe it came from Family Fun Magazine. What we did was sort out the 6 colors in a box of Fruit Loops into their own bowls (good sorting exercise for preschoolers). Then pour each color into their own bag. Then roll over each bag so that you crush the rings into sprinkles.
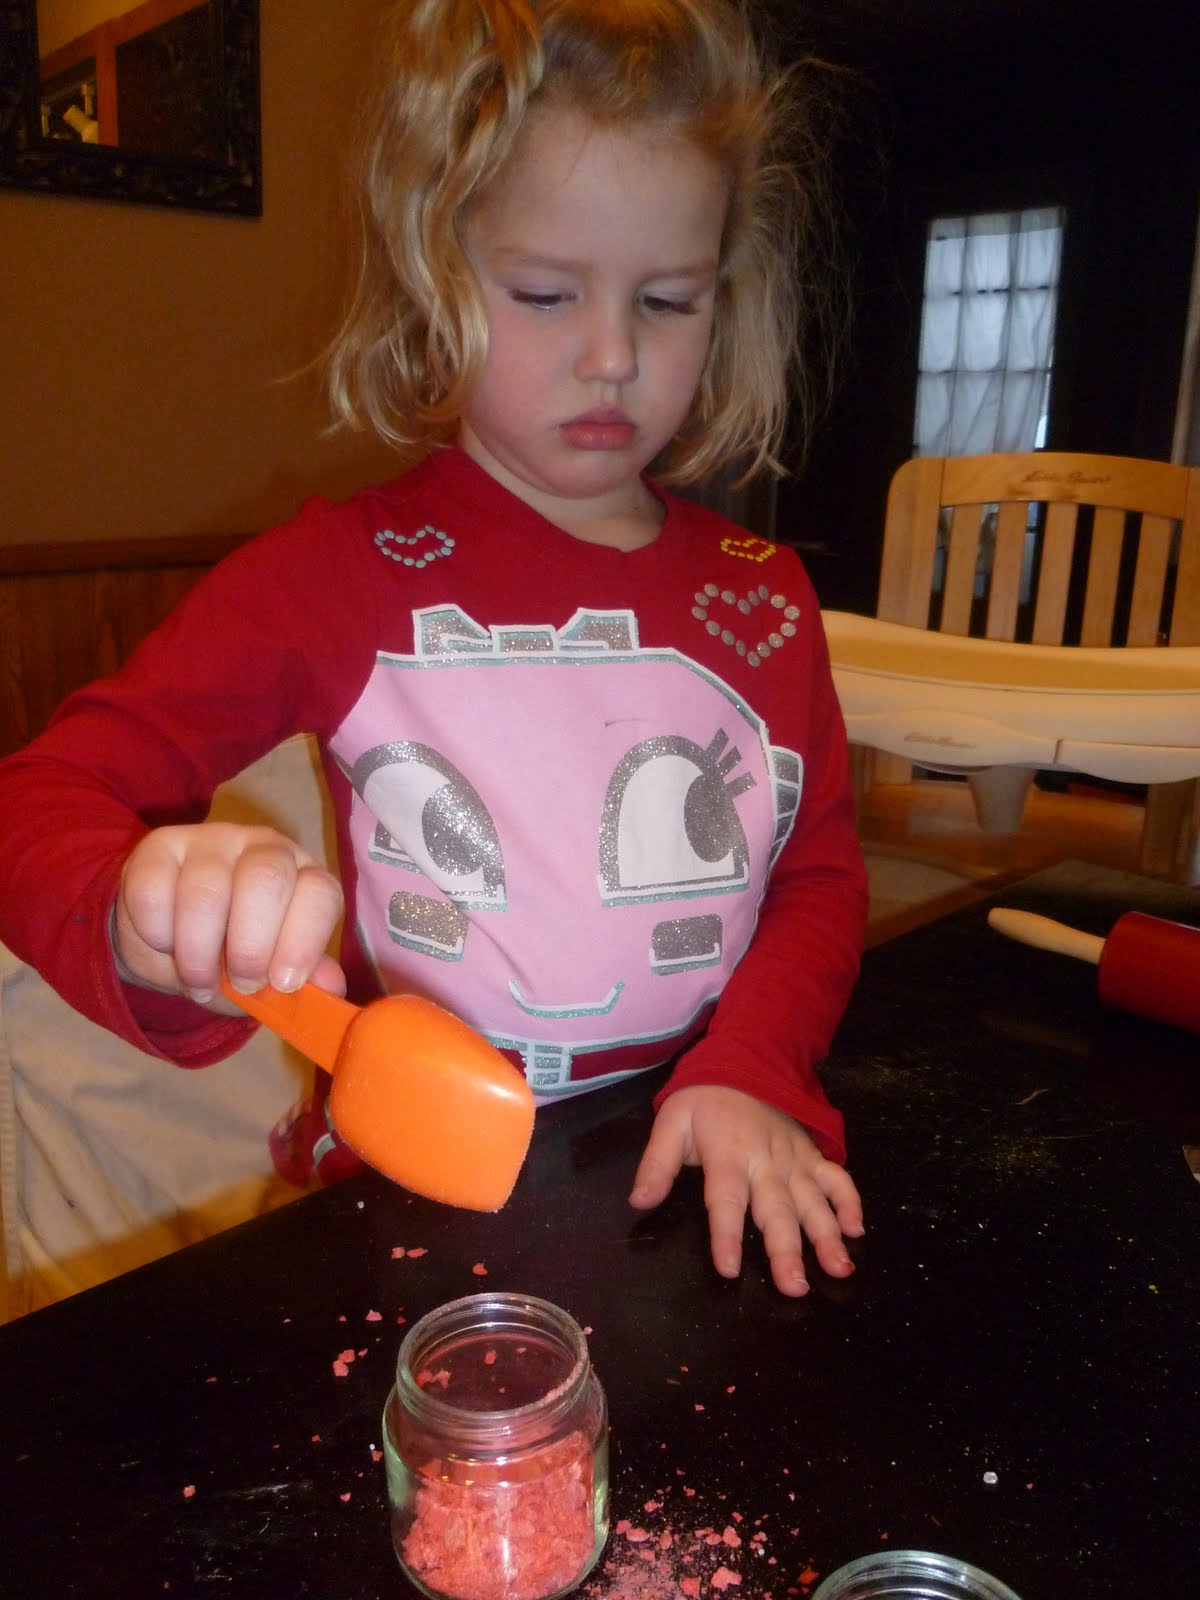 Then place a scoop of each in separate layers in each jar. We used old baby food jars (I had saved a bunch from the recycling when my son used to eat baby food, well, we still do some of the toddler chunks yet though.)
 If you want to do this activity as a teaching opportunity, you can put them in the order of ROYGBIV (well, minus one either indigo or violet.)
 And serve sprinkled on top of yogurt or ice cream. My daughter had a lot of fun making a bunch of these up to give to her friends as presents for Christmas (& one for herself, which she has been topping her yogurt with.)
#173 Make Puzzle Blocks For Your Child
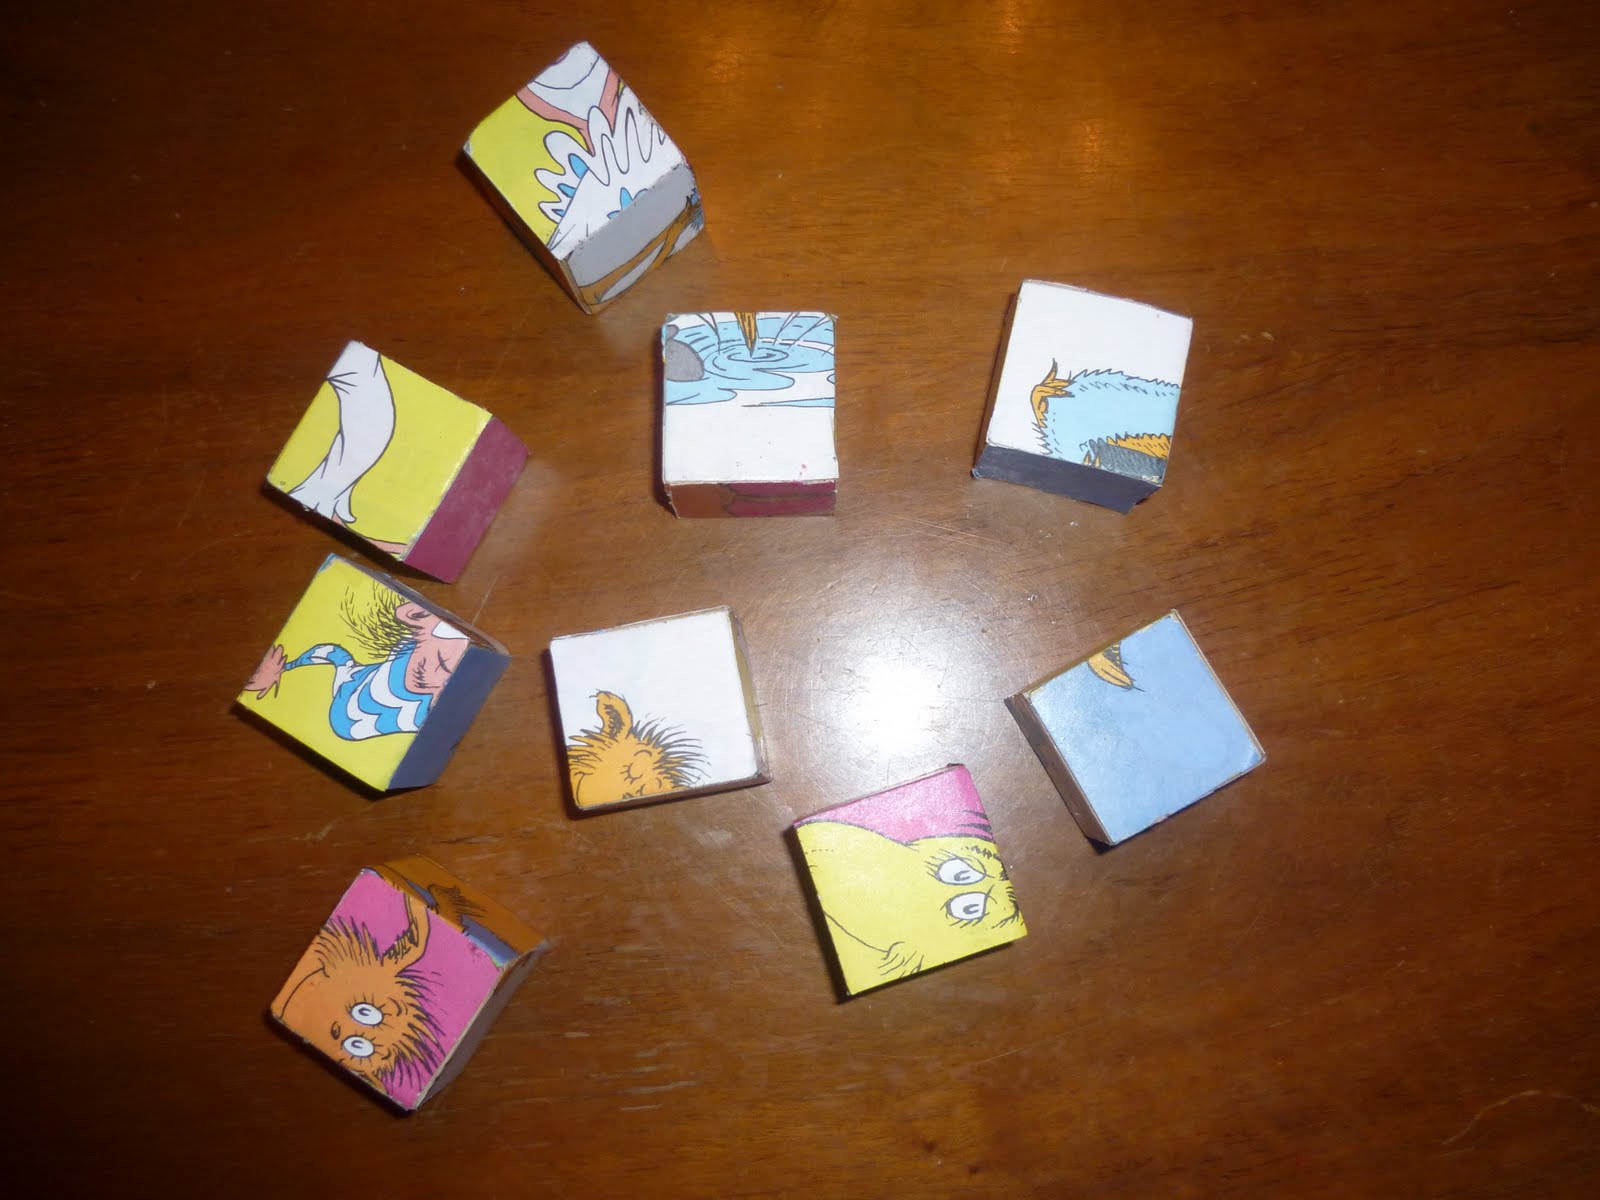 I mentioned these puzzle blocks in an earlier post. I used the same wood and cut out 9 matching squares, which we lightly sanded. Then using pictures from out of the "The Foot Book" (which a favorite in our house) which I picked up at a local thrift store, I made 6 different puzzles.
I placed all the blocks together then used spray adhesive on the top. I let it set for a couple seconds to get sticky and then pressed on the picture. Then I used an exacto-knife to trim off the edges of the picture and cut the blocks apart. And I repeated this method 5 more time to complete all 6 sides. Finally, I used some spray lacquer on all six sides to seal in the paper.
In the picture you see a representation of all the pictures used. The puzzle is a little advanced for my son at this point, but he will grow into it. Initially, he might just use it as blocks to make towers with and knock over.
#172 Make Your Own Laundry Soap
 You would have thought I would have done this before, but I had not. I actually decided to try it because I wanted to make some to give as gifts to friends for Christmas.
 Homemade Laundry Soap Recipe
2 C shredded soap bar ( I used an original Dial bar, but have seen recipes using Ivory & Fels Naptha too.)
1 C borax
1 C washing soda
Combine all items and mix. Use 1T in a front loader (or light loads in a top loader) or 2T ina top loader.

 I had doubled the recipe and made up 2 containers (above) that I was re-purposing for friends and an old Cool Whip container full. I have been using this laundry soap this week and it seems to work just fine.
 #171 Turn a Baby Food Jar into a Snow Globe
 My daughter helped me make this craft. We started with an empty, clean baby food jar and filled it with water. Then poured in some glitter and sequins to serve as "snow" and some sparkle. And finally, we found a snowman eraser and used some hot glue to adhere it to the inside of the lid. The screwed on the lid and Ta-da! We have a homemade snow globe without spending any money and re-purposing things we already owned.
Here are some other Baby Food Jar Crafts We have Made:
Christmas Decoupaged Tea Candle Holders
Rainbow Sprinkles in a Re-Purposed Jar
Baby Food Jar Santa
Valentine's Decoupaged Tea Candle Holder
Camping Nightlight
#169 & #170 MYO Fabric Gift Bags and Story Blocks
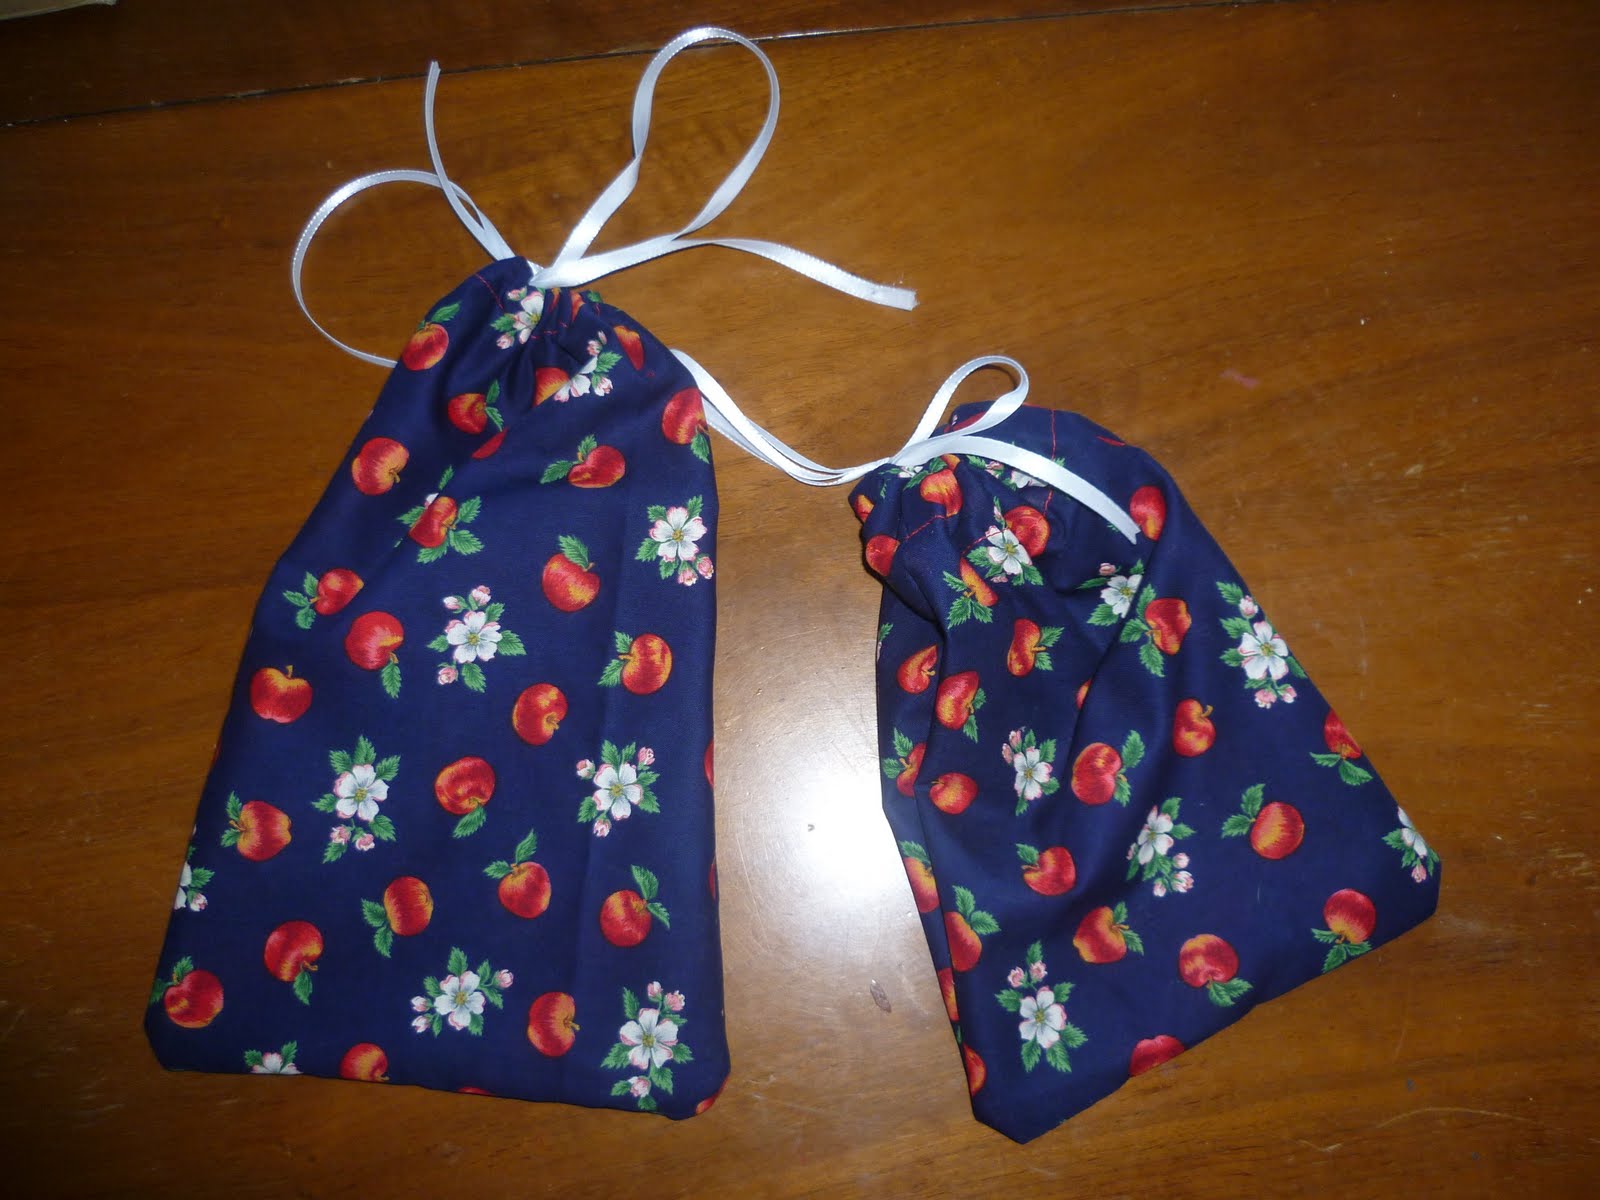 I made 3 different gift bags, two of which were stuffed with some other gifts. Gift bags are super easy to stitch up. I started by cutting out rectangular pieces of fabric. Straight stitched them with right sides together. Then folding over a hem at the top and stitching that closed, but leaving open a half inch so that I could string through ribbon. The ribbon is used to tie the bag shut. For the ribbon, I just used leftover stuff. The fabric was a new cut I had bought a while ago, but never used.
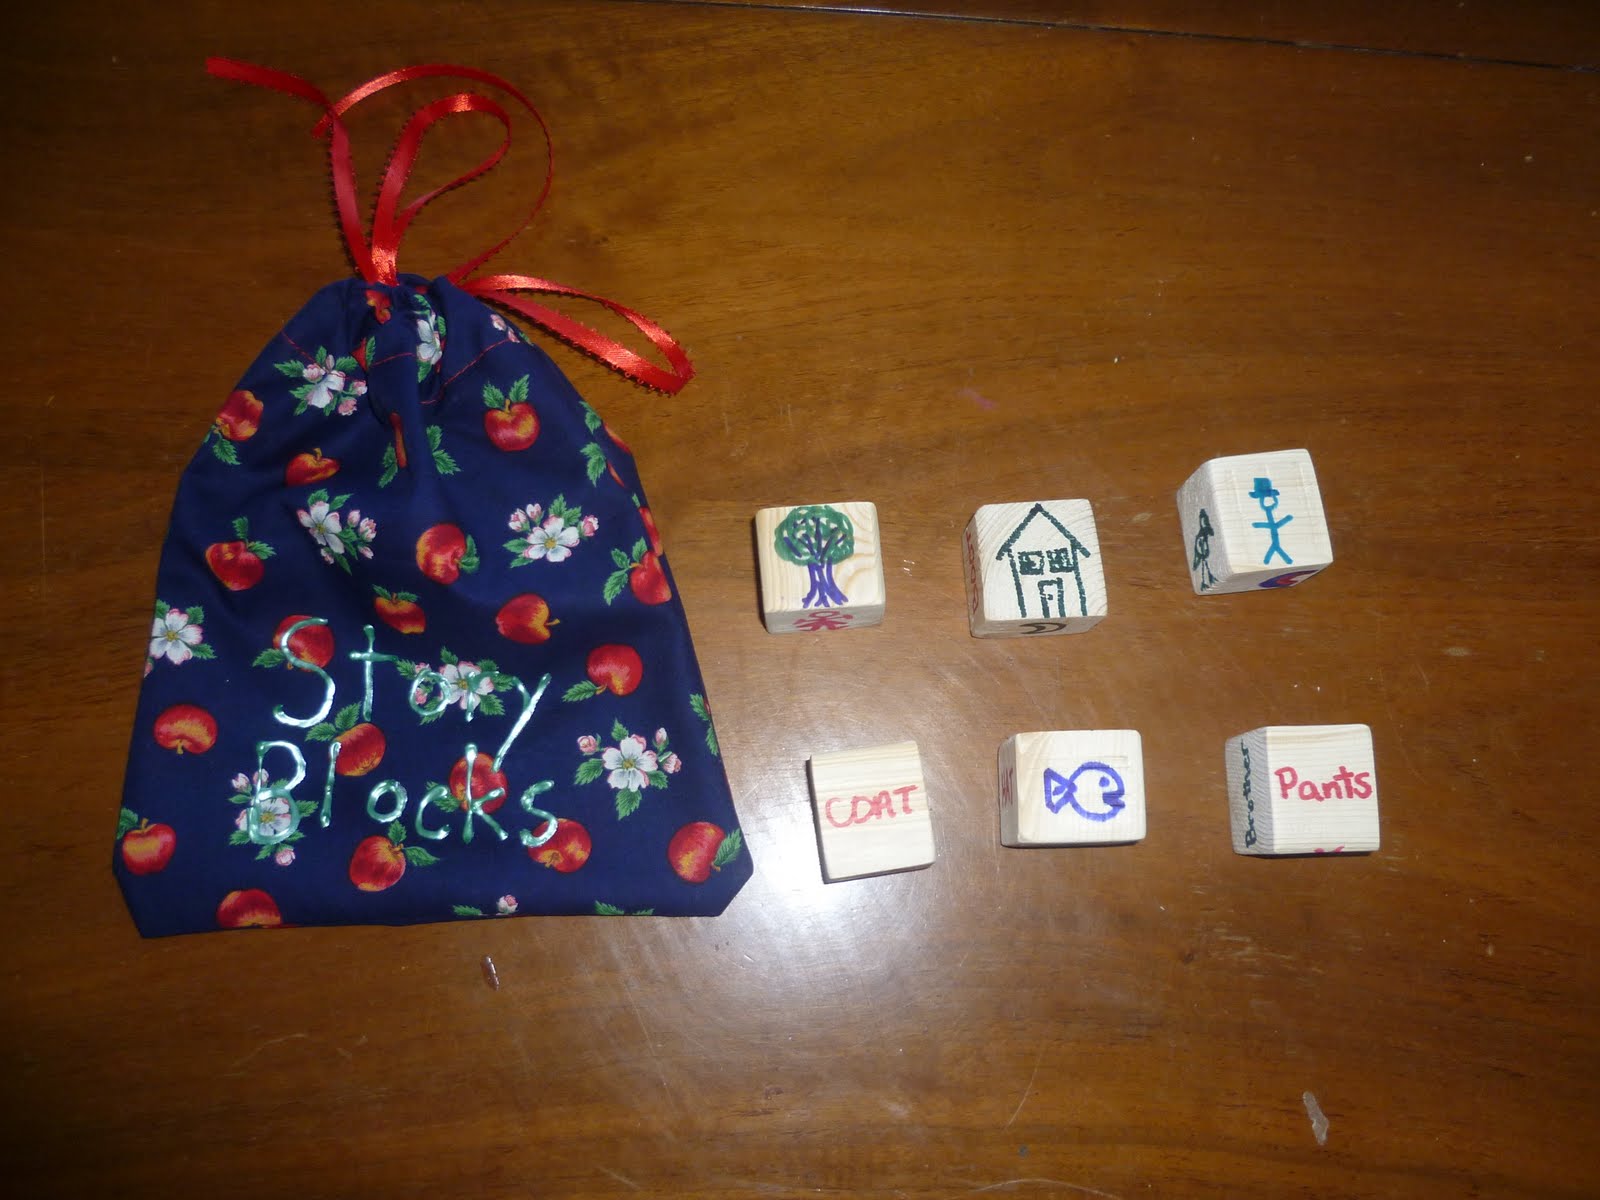 The third fabric bag I made I used fabric paint to write "Story Blocks" on it. The story blocks are a present for my daughter.
To make the story blocks, I simply bought a scrap piece of lumber at Menards (I found a scrap bin on the end of a row in the lumber department) and it was priced at 29 cents. Awesome! I was able to make this set of 6 story blocks (plus another set of 6 for a friend) and a set of 9 blocks for my son's puzzle blocks (to be posted soon).
I cut all the pieces so that they were square, sanded them, and then drew on pictures and words (thanks to my husband for helping me with sanding & drawing). The idea behind the story blocks is that she rolls them out of the bag and then has to tell me a story using all the words and pictures that are facing up.
#168 Use Leftover Fabric to Make Counting Bean Bags
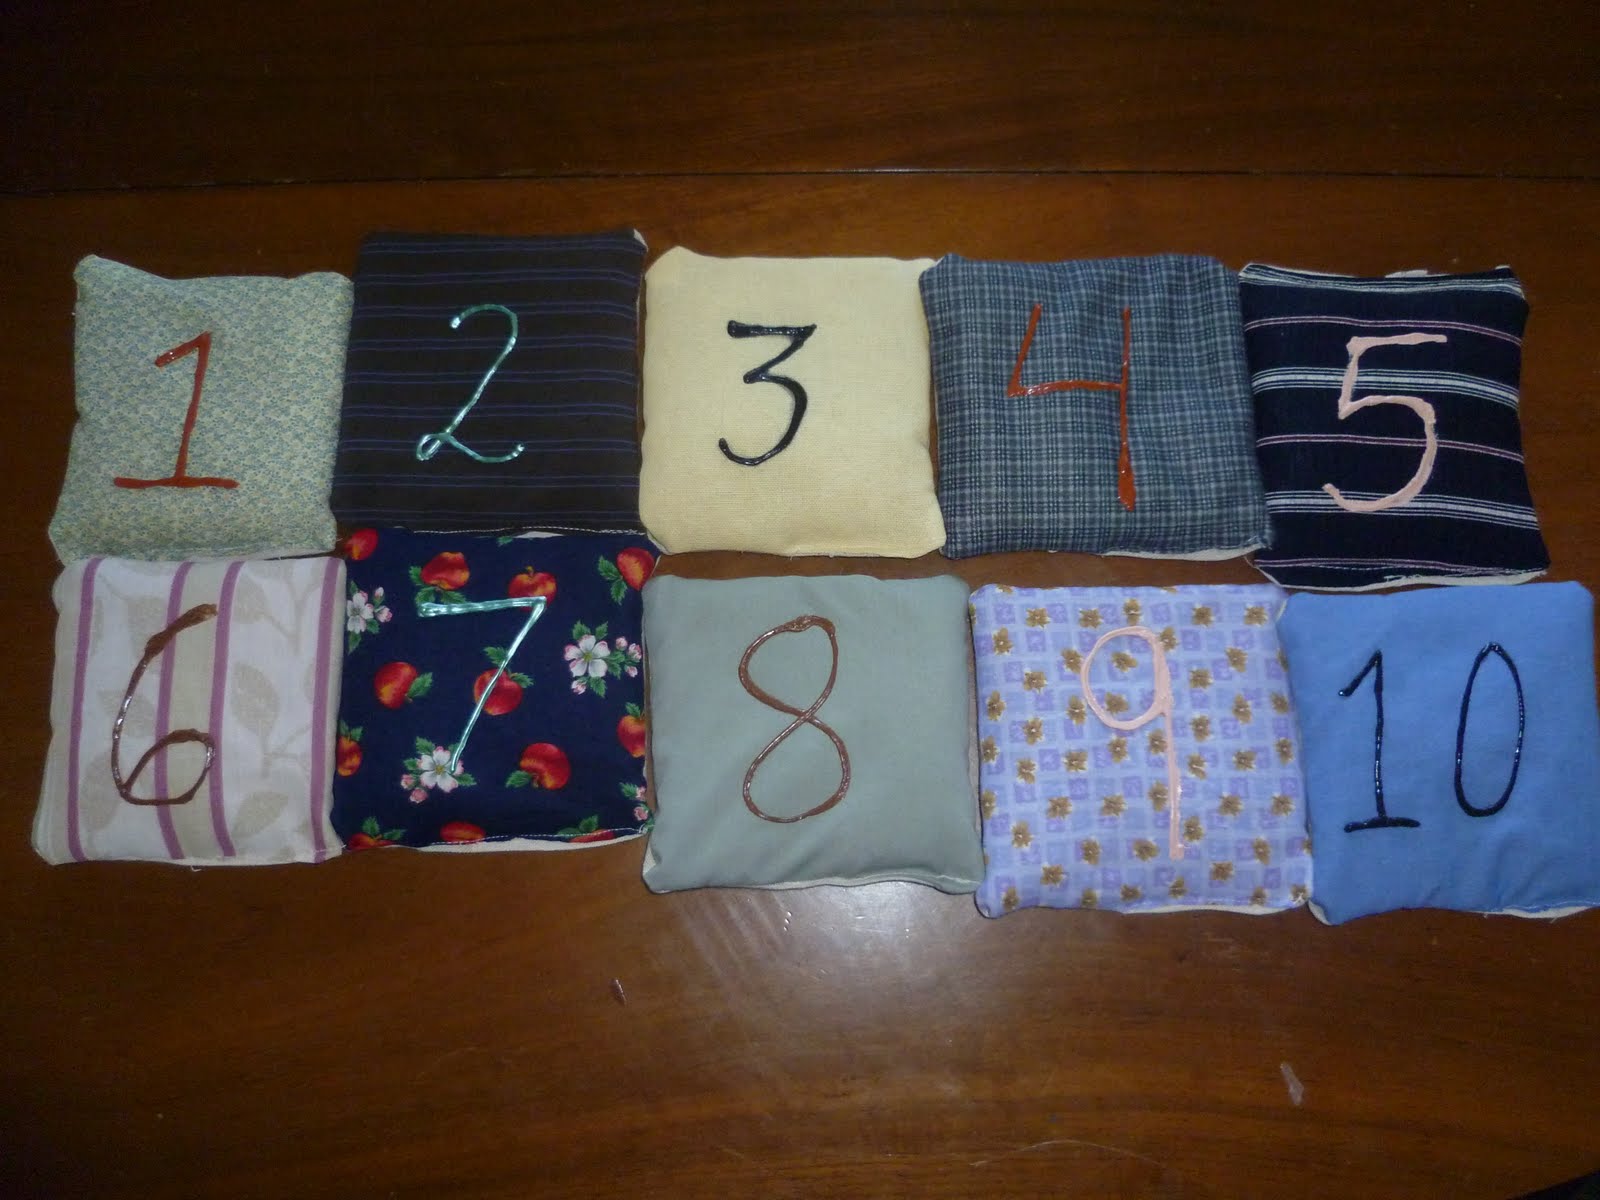 This is actually one of the gifts that I made my son for Christmas. I chose to fill my little tossing bags with rice since it was cheaper at the grocery store than dried beans.
 These are easy to make, just time consuming. I first cut out 10 squares in the same fabric for the back of the bags. Then I cut out fabric from 10 different leftover scraps. Actually, a couple of these squares are made from old dress shirts of my husbands that I have been cutting up to use for projects and others were leftovers.
After cutting out all the squares, I applied numbers by using fabric paint. After these were dry I stitched the squares together with right sides in, leaving about an inch open on the end of one side so that I could turn it back right side out and insert a funnel and fill with the rice.
I wanted to have numbers on them so that I could use them as a teaching tool. I also chose many different fabrics so that I could ask my son to throw a certain color of bag, thus using it as a teaching tool in another way. Plus, there all sorts of gross & fine motor skills that can be worked on with using the bag.
Wednesday, December 8, 2010
#167 Turn Old Sweaters into a Child's Dress
 My daughter asked me if I would make her a dress for a Christmas present. And since all her presents were all ready purchased, I didn't want to spend more money to buy a pattern & new fabric so I started thinking about what I had to use and I decided to use some old sweaters that I had recently retired to the craft box.
I used a dress that is currently a perfect fit on her and just altered the measurements to make it slightly larger so it will be something she can wear all winter and now my daughter has a cashmere (blue) and wool (red) dress.
To save myself time & energy I made sure to use the bottom hem of a sweater as the bottom hem of the dress so that I wouldn't have to create a hem. I also had decided on using the red sweater because it had shrunk (quite a bit in the arms) so that I did not need to alter the arm circumference.
I did need to take in the sides and shorten the arm length and create new arm holes. The knew arm holes in the sleeves and on the body was what took the longest to do. I sure hope she likes it.
Subscribe to:
Posts (Atom)